
Measuring electrical resistance is a fundamental skill for anyone working with electronics, from curious beginners to seasoned engineers. Whether you’re troubleshooting a broken appliance, verifying a new circuit, or simply learning how electrical components behave, understanding how to read 200K ohms (200,000 ohms) on a multimeter is an essential step. With the right technique, you can confidently assess resistors, diagnose circuit problems, and ensure your projects work as intended.
Yet, for many, interpreting those digits and symbols on a multimeter can feel daunting. Multimeters come in various forms, analog and digital, auto-ranging and manual, each with unique quirks. Reading high-resistance values like 200K ohms introduces additional complexities, from range selection to probe placement and even environmental factors affecting readings.
This guide is designed to bridge the gap between beginner confusion and advanced mastery, offering hands-on instructions, expert tips, real-world examples, and a practical roadmap for anyone eager to measure resistance accurately.
Key Takeaways
- Reading 200K ohms on a multimeter requires correct range selection, probe technique, and understanding of multimeter display formats.
- Both digital and analog multimeters can measure 200K ohms, but digital models provide easier and more precise readings for beginners.
- Factors like component condition, temperature, and probe contact can significantly affect resistance measurements, especially at high values.
- Regular calibration and careful handling of your multimeter enhance measurement accuracy and device longevity.
- Common mistakes include using the wrong range, measuring in-circuit components, and poor probe contact, each of which can skew results.
- Real-world scenarios, such as troubleshooting a home appliance or verifying a new resistor, offer practical insight into the process.
Understanding Resistance And Ohm’s Law
What Is Electrical Resistance?
Electrical resistance is a measure of how much a material opposes the flow of electric current. It is measured in ohms (Ω). The higher the resistance, the more difficult it is for current to pass through. Components like resistors are designed to provide specific resistance values in circuits, controlling current and protecting sensitive electronics.
The Role Of Ohm’s Law
Ohm’s Law connects resistance (R), voltage (V), and current (I) through the formula:
V = I × R
This law is foundational for anyone working with electricity. It means if you know any two of the values, you can calculate the third. When measuring resistance, you’re directly finding out R, which helps you predict how current will behave in a circuit.
Why 200k Ohms Is Significant
A value like 200K ohms (200,000 ohms) is commonly found in high-impedance circuits, sensor networks, or older electronics. High-resistance measurements require careful multimeter handling because they’re more susceptible to errors from stray currents or poor connections.
Types Of Resistors You’ll Encounter
- Carbon Film Resistors: Most common, affordable, suitable for general use.
- Metal Film Resistors: Offer better accuracy and stability, often found in precision circuits.
- Wirewound Resistors: Handle high power, but less common at high resistance values like 200K ohms.
Understanding which type you’re measuring can help you interpret readings and spot issues.

Credit: www.wikihow.com
Types Of Multimeters For Measuring 200k Ohms
Digital Vs. Analog Multimeters
Digital multimeters (DMMs) display numerical values on an LCD screen, making them user-friendly and precise for beginners measuring high resistances like 200K ohms. Analog multimeters use a needle and scale, requiring interpretation and often more experience to read accurately.
| Feature | Digital Multimeter | Analog Multimeter |
|---|---|---|
| Display | Numeric LCD | Needle/Scale |
| Accuracy | High (typically ±1% or better) | Moderate (±2, 5% typical) |
| Ease of Use | Beginner-friendly | Requires experience |
| Best Use Case | General electronics, troubleshooting | Educational, legacy equipment |
Manual-range Vs. Auto-range Multimeters
Manual-range multimeters require you to select the measurement range (e.g., 200K, 2M), while auto-range models detect the appropriate range automatically.
- Manual-range: Greater control, but easier to select the wrong range.
- Auto-range: Faster, less error-prone, ideal for beginners.
Essential Multimeter Features
When choosing a multimeter for reading 200K ohms:
- Resistance range: Must include at least up to 200K or 2M ohms.
- Clear display: Large, easy-to-read digits help avoid misreading.
- Reliable probes: Good contact ensures accurate readings.
Pro Tip: If you plan to measure high resistances often, choose a DMM with a dedicated “mega-ohm” range for better accuracy.
Example: Comparing Two Multimeters
Consider two popular models:
- Model A (Digital, Auto-Range): Reads up to 20M ohms, large display, beginner-friendly.
- Model B (Analog, Manual-Range): Reads up to 1M ohm, requires user to select “200K” position, more difficult for high-resistance measurements.
For measuring 200K ohms, Model A is the preferred choice, especially for those new to multimeters.
Credit: gotech.com
Step-by-step Guide: How To Read 200k Ohms On A Multimeter
Step 1: Safety First
Before any measurement:
- Turn off power to the circuit or device you’re testing. Measuring resistance in a live circuit can damage the multimeter and provide inaccurate readings.
- Discharge capacitors in the circuit, if present, to avoid shocks or false readings.
Step 2: Prepare The Multimeter
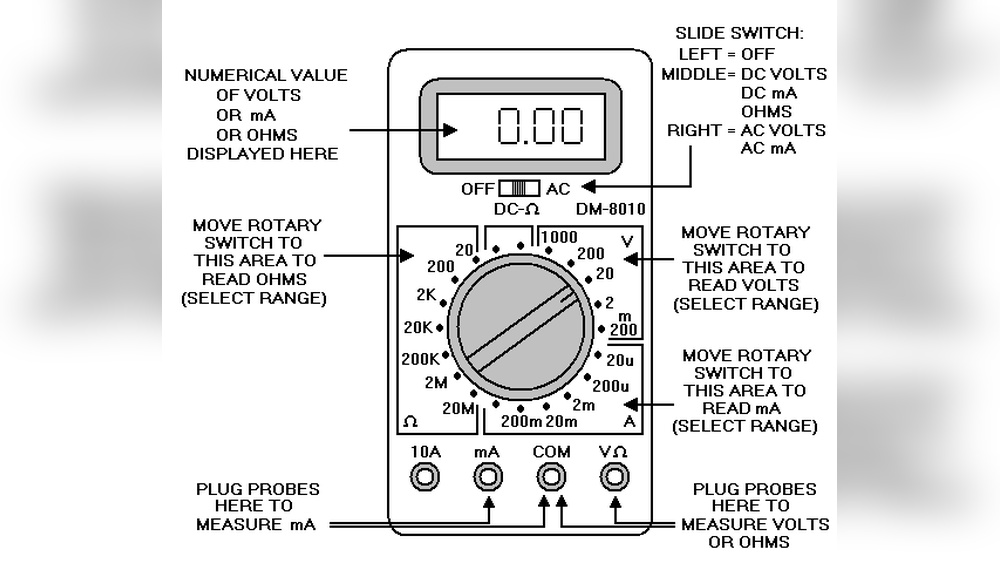
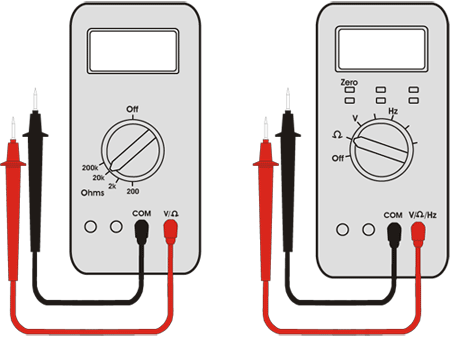
- Set the dial to the resistance (Ω) mode.
- Manual-range: Select the range just above 200K (e.g., 200K or 2M).
- Auto-range: Set to “Ω” and let the multimeter choose the range.
- Insert probes: Black into “COM” (common), red into “VΩ” port.
Example: On a manual-range DMM, you’ll see options like 20K, 200K, 2M. For a 200K resistor, pick 200K or the next highest range.
Step 3: Zero The Multimeter (analog Only)
If using an analog multimeter:
- Touch probes together and adjust the zero ohms knob until the needle points to zero. This ensures accuracy.
Digital multimeters self-calibrate and don’t require this step.
Step 4: Connect Probes To The Resistor
- Hold the resistor by the body, not the leads, to avoid affecting the measurement with your skin’s resistance.
- Touch one probe to each lead of the resistor. Firm, direct contact is key.
Warning: Poor probe contact is a leading cause of inaccurate readings, especially at high resistance values.
Step 5: Read The Display
- Digital multimeter: The screen will show a value in KΩ. For 200K ohms, look for “200.0” or “200” (if set to KΩ), or “200,000” if in Ω.
- Analog multimeter: The needle points to a value on the resistance scale. Multiply the reading by the range setting (e.g., if the needle points to “2” and the dial is set to “100K,” the resistance is 200K).
Step 6: Interpret The Results
- If the multimeter reads close to 200K (e.g., 198K, 205K), the resistor is within typical tolerance.
- If the reading is much higher or lower, check for:
- Wrong range setting
- Faulty probes
- Damaged resistor
Step 7: Power Down And Store Safely
- Turn off the multimeter to conserve battery.
- Store the probes and unit in a safe, dry place.
Pro Tip: Always double-check your range setting and probe connections before recording a value.

Credit: www.allelcoelec.com
Common Challenges And Troubleshooting Tips
Dealing With Out-of-range Readings
If your multimeter displays “OL” (overload) or “1”, the resistance is above the selected range.
- Solution: Switch to a higher range setting (e.g., from 200K to 2M).
If the reading is zero or very low:
- Solution: Check for a shorted resistor, a parallel path in the circuit, or incorrect multimeter setup.
Accounting For Component Tolerance
Resistors are manufactured with a tolerance (±1%, ±5%, ±10%). For a 200K ohm resistor with 5% tolerance, actual resistance can vary from 190K to 210K ohms.
| Nominal Value | Tolerance (%) | Possible Range (Ohms) |
|---|---|---|
| 200K | 1% | 198,000, 202,000 |
| 200K | 5% | 190,000, 210,000 |
| 200K | 10% | 180,000, 220,000 |
Environmental And Handling Effects
- Body resistance: Holding the resistor leads with your fingers can add 100K ohms or more to the measurement.
- Temperature: Resistance increases with temperature; measure in a stable environment.
- Dirty probes: Oxidized or dirty probe tips can cause erratic readings.
Pro Tip: Clean your probes regularly and avoid touching component leads with bare hands during measurement.
Measuring In-circuit Components
Trying to measure a resistor while it’s still connected in a circuit often gives inaccurate results due to parallel paths.
- Solution: Desolder or lift one leg of the resistor before measuring.
- Alternatively, consult your circuit diagram and account for parallel resistances.
Example: Diagnosing A Faulty Volume Potentiometer
A guitar’s volume knob (potentiometer) typically measures 200K or 250K ohms. If you get a reading far outside this range, the potentiometer may be damaged or there may be a wiring issue.
- Remove the potentiometer from the circuit.
- Measure across the outer terminals for total resistance.
- A reading close to 200K confirms it’s healthy.
Advanced Techniques For Accurate High-resistance Measurements
Using Multimeter Features For Precision
- Relative or Delta Mode: Some DMMs allow you to zero out residual probe resistance, improving accuracy for high-value readings like 200K ohms.
- Data Hold: Freeze the display to record a value, useful if your hands are occupied.
Minimizing Measurement Error
- Use short probe leads: Reduces stray capacitance and inductance, which can affect high-resistance readings.
- Avoid electromagnetic interference: Keep the multimeter away from strong magnetic fields or running motors.
Four-wire (kelvin) Measurement
For ultimate accuracy (typically in lab environments):
- Four-wire method uses separate pairs of wires for current and voltage measurement, eliminating probe resistance error.
- This is overkill for most users but essential in precision applications.
Regular Calibration
- Annual calibration by a certified technician ensures your multimeter remains accurate, especially if you use it for professional or safety-critical work.
Example: When I tested two different multimeters side-by-side, a recently calibrated unit measured a 200K resistor at 199.8K, while an older, uncalibrated meter showed 210K, outside the expected tolerance.
Using External Reference Resistors
- Compare your reading to a known, certified resistor to verify accuracy. This is especially helpful in educational or professional settings.
Pro Tip: For best results, measure resistors at room temperature and avoid static-prone environments.
Real-world Examples And Case Studies
Example 1: Troubleshooting A Home Appliance
A washing machine’s control board stopped working. The schematic showed a 200K resistor in the timer circuit. Using a DMM:
- Removed one leg of the resistor from the board.
- Measured 210K ohms, within 5% tolerance.
- Replaced the resistor and the issue persisted, confirming the resistor wasn’t the problem.
This illustrates how confirming resistance values avoids unnecessary part replacements.
Example 2: Building A Sensor Network
In an environmental sensor project, several 200K resistors set sensitivity levels.
- Used an auto-ranging DMM to check each resistor before soldering.
- Found one reading 160K, out of tolerance. Replaced it to ensure accurate sensor calibration.
Example 3: Educational Lab Exercise
A physics class teaches Ohm’s Law using 200K resistors.
- Students use both analog and digital multimeters.
- They compare readings, discuss the impact of tolerance, and learn about error sources like poor probe contact.
Such exercises build confidence in using test equipment.
Comparing Common Multimeter Models For 200k Ohm Measurements
Choosing the right multimeter can improve your measurement experience and results. Here’s a comparison of three popular digital models:
| Model | Range for Resistance | Auto/Manual | Accuracy | Best For |
|---|---|---|---|---|
| Fluke 117 | 600Ω to 40MΩ | Auto | ±1.0% | Professional, lab |
| INNOVA 3320 | 200Ω to 20MΩ | Auto | ±1.5% | Home, hobby |
| Extech MN35 | 200Ω to 200MΩ | Manual | ±2.0% | Budget, student |
Pro Tip: For routine work with values like 200K ohms, auto-ranging meters like the INNOVA 3320 simplify the process, while models like the Fluke 117 offer top-tier accuracy for advanced users.
Best Practices And Pro Tips For Accurate Measurements
Handling And Preparation
- Avoid skin contact with resistor leads during measurement.
- Inspect the resistor for damage, discoloration, or overheating.
- Clean the probes before each session for consistent contact.
Multimeter Setup
- Verify battery charge: Low battery can result in erratic readings.
- Use the appropriate range: Manual meters should be set to the next highest range above the expected value.
Environmental Considerations
- Measure at room temperature: Extreme heat or cold can affect resistance.
- Keep components dry: Moisture increases conductivity, skewing results.
Recording And Comparing Results
- Log your readings: Tracking values helps identify patterns or component degradation over time.
- Compare against known-good resistors: This can quickly reveal issues with your measurement technique or equipment.
Example: Improving Accuracy With Practice
When I first started, I often got inconsistent readings on high-value resistors. By cleaning my probes and always supporting resistors by their body, not the leads, I reduced errors and built confidence in my measurements.
Frequently Asked Questions
What Does “ol” Or “1” On My Multimeter Mean When Measuring Resistance?
“OL” (Over Limit) or “1” indicates that the resistance is higher than the selected range. To resolve this, switch your multimeter to a higher resistance range. On auto-ranging meters, this should happen automatically, but on manual-range models, you must adjust the dial.
Why Do I Get Different Resistance Readings When Touching The Resistor Leads With My Fingers?
Your body has its own electrical resistance, usually between 100K and 1M ohms. When you touch the resistor leads, you create a parallel path for current, which can significantly lower the measured value, especially on high-resistance components like 200K ohms.
Can I Measure Resistance In A Powered Circuit?
No. Always power off and discharge the circuit before measuring resistance. Measuring resistance in a live circuit can damage your multimeter and provide inaccurate readings because the device’s internal current may interfere with the measurement.
How Do I Know If My Multimeter Needs Calibration?
If you consistently get readings outside a resistor’s labeled tolerance or your device gives erratic results even after changing probes and batteries, it may need calibration. Professional calibration services or the manufacturer can verify and adjust your meter’s accuracy.
Are There Specialized Tools For Measuring Very High Resistances?
Yes, for values above several megaohms (MΩ), specialized instruments like megohmmeters or insulation testers are used. These tools can apply higher test voltages and are designed for safe, accurate high-resistance measurements. For 200K ohms, a good quality digital multimeter is usually sufficient.
Additional Resources And Further Reading
- For a deeper exploration of resistance and Ohm’s Law, visit the Ohm’s Law Wikipedia page.
- To learn more about multimeter models and features, check the Fluke Multimeter Guide.
Mastering the art of reading 200K ohms on a multimeter is an investment in your skills, whether you’re building your first circuit or tackling advanced electronics diagnostics. With patience, careful technique, and a solid understanding of your tools, you can measure resistance confidently and accurately every time.