

Mastering the Multimeter: A Complete Guide to Troubleshooting Common Electrical Problems
Understanding how to use a multimeter is a fundamental skill for anyone working with electronics, from hobbyists and homeowners to professional technicians. This compact, versatile tool helps diagnose a range of issues, whether you’re fixing a malfunctioning appliance, troubleshooting your car’s electrical system, or ensuring safe wiring in your home. With electrical faults costing U.S. consumers billions annually and causing thousands of injuries (according to the National Fire Protection Association), learning to safely and effectively use a multimeter is both empowering and essential.
This guide is crafted to be accessible for beginners while offering deeper insights and pro-level advice for advanced users. Through detailed explanations, practical examples, comparison tables, and actionable steps, you’ll learn not only the basics of multimeter operation but also how to apply it to real-world troubleshooting scenarios.
Whether you’re looking to test batteries, identify wiring faults, or diagnose circuit board issues, this article will equip you with the knowledge and confidence to tackle electrical challenges safely and efficiently.
Key Takeaways
- Multimeters are essential tools for diagnosing voltage, current, and resistance in electrical circuits.
- Proper multimeter use prevents accidents and improves troubleshooting accuracy.
- Beginners should start with basic voltage and continuity tests; advanced users can leverage advanced functions like diode and capacitance testing.
- Real-world examples and comparison tables help clarify best practices and tool choices.
- Safety precautions and correct technique are critical, never ignore them when working with electricity.
- FAQs provide additional insights, supplementing the main guide with expert tips.

Credit: www.youtube.com
Understanding Multimeters: Types And Functions
Multimeters come in various forms, and their functions have evolved over decades. Selecting the right multimeter and mastering its use is the first step toward effective troubleshooting.
Types Of Multimeters
There are two primary types:
- Analog Multimeters: These use a needle and scale for readings. While less common today, they offer real-time movement that can help spot fluctuating signals.
- Digital Multimeters (DMMs): These display readings numerically, providing greater accuracy and ease of use. Most modern troubleshooting relies on DMMs.
Comparison Table: Analog Vs Digital Multimeters
| Feature | Analog Multimeter | Digital Multimeter |
|---|---|---|
| Accuracy | Moderate | High |
| Ease of Use | Requires interpretation | Simple numeric display |
| Price | Generally lower | Wide range ($10-$200+) |
| Durability | Fragile needle | Robust construction |
| Advanced Features | Limited | Auto-range, diode test, etc. |
Key Functions Of A Multimeter
- Voltage measurement (AC/DC)
- Current measurement (AC/DC)
- Resistance measurement
- Continuity test
- Diode and transistor test (advanced models)
- Capacitance measurement (high-end models)
Understanding these functions is crucial. For beginners, focus on voltage, resistance, and continuity. Advanced users can leverage diode and capacitance testing for deeper troubleshooting.
Multimeter Controls And Settings
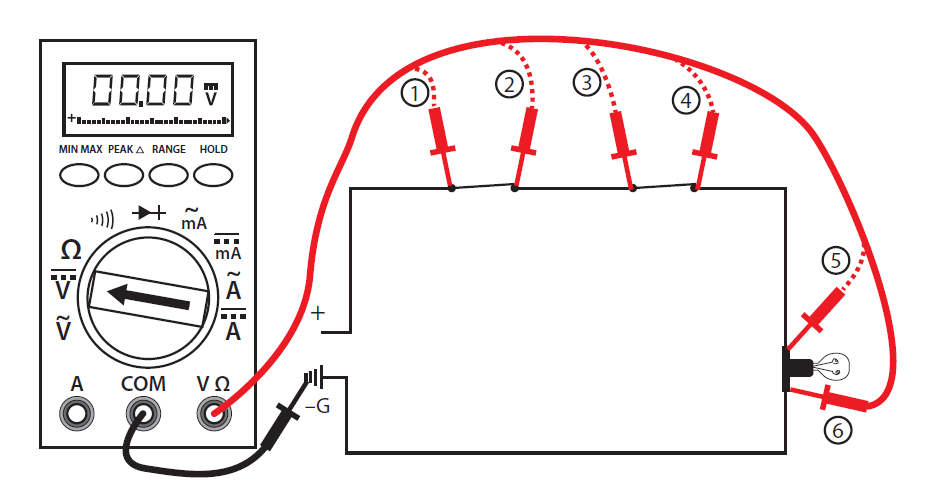
A typical DMM features:
- Selector dial: Switch between functions (voltage, current, resistance).
- Input ports: Usually marked as COM (common/ground), VΩmA (voltage, resistance, milliamps), and 10A (high current).
- Display: Shows readings numerically.
- Probes: Red (positive) and black (negative).
Pro Tip: Always start with the selector dial on the highest range when measuring unknown values to avoid damaging the device.
Credit: ecampusontario.pressbooks.pub
Essential Safety Precautions When Using A Multimeter
Safety is paramount when working with electrical circuits. Even seasoned professionals adhere to strict protocols to prevent accidents.
General Safety Guidelines
- Inspect your multimeter and probes for damage before each use.
- Never measure voltage with the meter set to resistance or current, this can destroy the device.
- Avoid direct contact with live wires; always use insulated probes.
- Start with the highest setting when measuring unknown values.
- Disconnect power whenever possible before testing components.
According to the Occupational Safety and Health Administration (OSHA), improper electrical testing is a leading cause of workplace injuries. Following proper safety steps reduces risk substantially.
Handling High-voltage And High-current Circuits
- Use CAT-rated multimeters for high-voltage environments (e.g., industrial equipment).
- Wear insulated gloves and stand on a dry, insulated surface.
- Keep one hand in your pocket to avoid accidental current paths across your heart.
Warning: Never attempt to troubleshoot household mains or industrial power unless you are trained and using a properly rated multimeter.
Multimeter Fuses And Protection
Most DMMs include internal fuses to prevent overload. If your multimeter stops working after measuring high current, check and replace the fuse before further use.

Credit: senseicollege.co.ke
Step-by-step Guide: Using A Multimeter For Common Problems
Whether you’re a beginner or advanced user, these step-by-step instructions cover the most frequent troubleshooting scenarios.
Testing Batteries And Power Supplies
Beginner Steps
- Set multimeter to DC voltage.
- Insert black probe into COM, red probe into VΩmA.
- Touch probes to battery terminals; red to positive, black to negative.
- Read voltage, compare to battery label.
Example: A 1.5V AA battery reading 1.2V is nearing depletion.
Advanced Suggestions
- For rechargeable batteries, test under load for a more accurate assessment.
- Use min/max recording if your DMM supports it to track voltage drops.
Checking Wall Outlets For Proper Voltage
Beginner Steps
- Set multimeter to AC voltage.
- Insert probes into outlet slots; black in neutral, red in hot.
- Typical U.S. outlets should read 120V.
Example: If the reading is significantly lower, contact a qualified electrician.
Advanced Suggestions
- Test ground to hot and neutral to ground for complete diagnostics.
- Look for voltage fluctuations, indicative of wiring issues or overloaded circuits.
Diagnosing Continuity In Wires And Fuses
Beginner Steps
- Set multimeter to continuity (symbol: Sound wave or diode).
- Touch probes to both ends of wire or fuse.
- Listen for beep or look for near-zero resistance.
Example: No beep or infinite resistance means the wire or fuse is broken.
Advanced Suggestions
- For complex wiring, map continuity across multiple points.
- Use probe extensions for hard-to-reach locations.
Measuring Resistance In Components
Beginner Steps
- Set to resistance (Ω).
- Touch probes to component terminals.
- Compare reading to expected value.
Example: A 10Ω resistor should read close to 10Ω. Significant deviation means it’s faulty.
Advanced Suggestions
- For circuit boards, remove components before testing to avoid parallel paths.
- Use four-wire measurement for precise low-resistance readings.
Testing Diodes And Transistors (advanced)
- Set to diode test.
- Place probes on diode terminals.
- Forward bias should show a voltage drop (typically 0.6, 0.7V for silicon diodes).
- Reverse bias should show no conduction.
Example: A failed diode reads near-zero in both directions.
Pro Tip: Consult datasheets for correct values, especially for advanced components.
Real-world Examples And Case Studies
Applying multimeter skills to actual troubleshooting situations brings theory to life. Here are two authentic cases:
Example 1: Diagnosing A Dead Laptop Charger
A user’s laptop wasn’t charging. Using a multimeter:
- Tested the charger output, no voltage detected.
- Checked the cable, no continuity.
- Conclusion: Internal wire break. Replaced charger, laptop powered up.
Example 2: Faulty Home Light Fixture
A homeowner’s ceiling light flickered. Steps taken:
- Tested switch: Continuity good.
- Checked fixture voltage: 120V present.
- Measured bulb resistance: Open circuit.
- Replaced bulb, problem solved.
Example 3: Automotive Electrical Issue
A car’s headlights wouldn’t turn on. Multimeter troubleshooting revealed:
- Fuse: Continuity test failed.
- Replaced fuse, headlights restored.
According to the National Highway Traffic Safety Administration, electrical faults are a common cause of vehicle breakdowns, quick multimeter diagnostics can save significant repair costs.
Advanced Multimeter Features And Techniques
Experienced users can leverage specialized multimeter functions for deeper diagnostics.
Auto-ranging And Manual Range Selection
- Auto-ranging simplifies use by automatically selecting the best measurement range.
- Manual range allows precise control, useful when measuring small or large values.
Pro Tip: For sensitive circuits, manual range prevents accidental overloads.
Min/max And Data Hold Functions
- Min/Max recording captures voltage or current fluctuations.
- Data hold freezes readings for convenience, especially in tight spaces.
Capacitance And Frequency Measurement
- High-end DMMs measure capacitance (for capacitors) and frequency (for oscillators).
- Useful for advanced electronics troubleshooting.
Example: Measuring capacitance to diagnose a failed capacitor in a power supply.
Wireless And Bluetooth Multimeters
Modern multimeters offer Bluetooth connectivity, allowing remote monitoring and data logging via smartphones. This feature is invaluable in industrial settings or for documenting repairs.
Comparison Table: Standard Vs Bluetooth Multimeters
| Feature | Standard DMM | Bluetooth DMM |
|---|---|---|
| Data Logging | Manual | Automatic, app-integrated |
| Remote Monitoring | No | Yes (via smartphone) |
| Price | Low to moderate | Higher ($60-$300+) |
| Use Case | Personal, basic | Industrial, advanced |
Troubleshooting Guide: Common Problems And Solutions
Electrical issues range from simple dead batteries to complex circuit failures. This guide outlines typical faults and how to resolve them using a multimeter.
Problem 1: Device Won’t Power On
- Test battery or power supply voltage.
- Check fuse for continuity.
- Inspect switch contacts (resistance/continuity).
Problem 2: Flickering Lights Or Unstable Appliances
- Measure outlet voltage for stability.
- Test bulb or appliance for proper resistance.
- Inspect wiring for continuity.
Problem 3: High Energy Bills
- Use multimeter to check appliances for standby power draw.
- Measure current flow in circuits, identify “energy vampires.”
Problem 4: Automotive Electrical Faults
- Test battery voltage and charging system.
- Check fuse and relay continuity.
- Inspect wiring harness for breaks.
Problem 5: Circuit Board Issues
- Measure voltage across points to spot failed traces.
- Test components (resistors, capacitors, diodes).
- Use advanced modes (capacitance, diode test) as needed.
Pro Tip: Always consult the schematic when troubleshooting circuit boards, random probing can cause damage.
Choosing The Right Multimeter For Your Needs
Selecting a multimeter is about balancing features, price, and your specific requirements. Here’s how to make an informed choice.
Essential Features For Beginners
- Auto-range
- Backlit display
- Continuity buzzer
- CAT safety rating
Example: A $30 digital multimeter from a reputable brand is sufficient for household use.
Advanced Features For Professionals
- True RMS measurement (for accurate AC readings)
- Bluetooth/data logging
- High current/voltage capacity
- Temperature measurement
Popular Multimeter Brands
| Brand | Key Features | Price Range |
|---|---|---|
| Fluke | High accuracy, rugged, pro-level | $80, $500 |
| Klein Tools | Reliable, good for homeowners | $30, $120 |
| Extech | Advanced functions, value | $40, $200 |
| Amprobe | Industrial, robust | $50, $250 |
For deeper analysis on multimeter selection and safety ratings, consult Wikipedia’s Multimeter Guide.
Practical Tips And Troubleshooting Mistakes To Avoid
Even experienced users can make errors that impact troubleshooting efficiency. Here’s how to avoid common pitfalls.
Mistake 1: Incorrect Meter Setting
- Always double-check dial position before measuring.
- Measuring voltage on the resistance setting can damage the meter.
Mistake 2: Poor Probe Contact
- Dirty or loose probe tips cause inaccurate readings.
- Clean regularly and apply firm pressure.
Mistake 3: Ignoring Safety Warnings
- Bypassing safety checks, especially with high-voltage circuits, is dangerous.
- Always use CAT-rated meters and proper PPE.
Mistake 4: Not Isolating Components
- Test components outside of the circuit for accurate readings.
- Parallel paths can distort results.
Mistake 5: Skipping Calibration
- Periodically calibrate your multimeter, especially before critical measurements.
- Professional calibration services ensure accuracy (see manufacturer guidelines).
Pro Tip: Keep a logbook of your readings, especially when diagnosing recurring faults. Patterns can emerge that help solve complex issues.
Frequently Asked Questions
How Can I Safely Measure Current With A Multimeter?
To measure current, you must connect the multimeter in series with the circuit, not in parallel. This means breaking the circuit and inserting the meter so that all current flows through it. Always start with the highest current range and check the meter’s fuse rating. For household and automotive applications, never exceed the meter’s rated current (often 10A).
What Does “auto-range” Mean, And Why Is It Helpful?
Auto-range allows the multimeter to automatically select the correct measurement scale, simplifying use for beginners and reducing risk of overload. It’s especially useful when measuring unknown values, as you don’t need to manually set the range. However, advanced users sometimes prefer manual range for greater control and faster readings.
Can A Multimeter Test For Polarity And Wire Identification?
Yes, a multimeter can identify polarity (positive vs negative) by measuring DC voltage, red probe to positive, black to negative. For wire identification, continuity tests help trace wires through walls or harnesses. Some advanced meters include tone generators for easier identification in complex systems.
What’s The Difference Between True Rms And Average Reading Meters?
True RMS multimeters measure the actual root mean square value of AC signals, which is crucial for accurately measuring non-sinusoidal waveforms (e.g., from variable speed drives or electronic ballasts). Average reading meters are only accurate for pure sine waves. For industrial and advanced troubleshooting, True RMS is essential, see Fluke’s official technical resources.
How Often Should I Calibrate My Multimeter?
For reliable measurements, calibrate your multimeter at least annually, or more frequently if used in professional environments. Calibration ensures accuracy and compliance with industry standards. Most manufacturers recommend professional calibration, though basic checks can be performed at home using known reference values.
Learning to use a multimeter is a blend of art and science, requiring both careful technique and a systematic approach. In my experience, mastering the basics provides a foundation for advanced troubleshooting and safety. With the right multimeter, proper procedures, and a willingness to learn, you can confidently tackle electrical problems in any setting.
Always prioritize safety, consult professional resources when in doubt, and let your multimeter guide you to clear and accurate answers.