
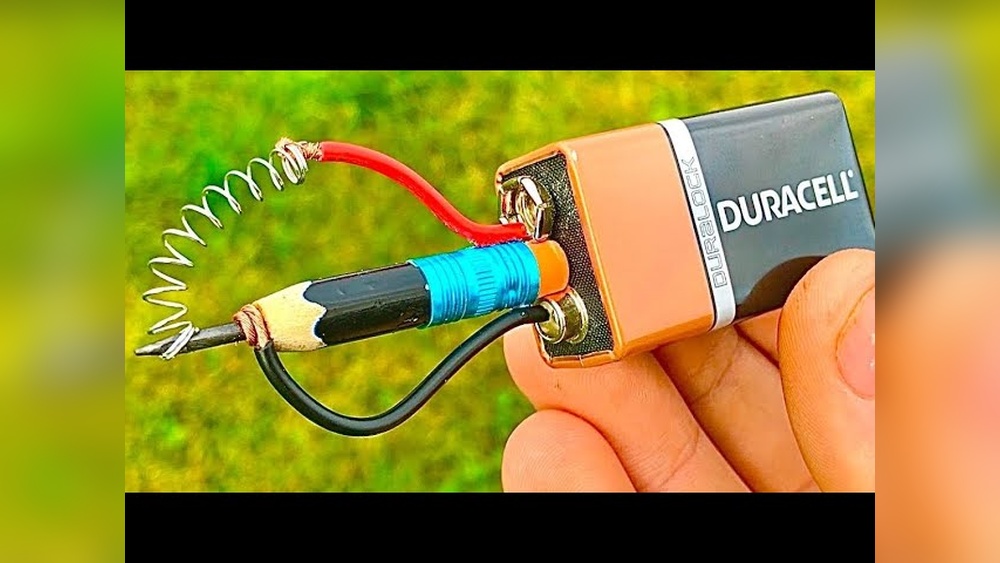
Building your own tools can be a deeply satisfying experience, especially when it means transforming everyday items into something functional and practical. The humble pencil, for instance, is more than just a writing instrument; with the right knowledge and safety precautions, it can be reengineered into a homemade soldering iron.
This approach not only provides an affordable solution for electronics enthusiasts and students but also offers a unique way to grasp the fundamental principles of conductivity and resistance.
In this article, you’ll discover a comprehensive, step-by-step guide to making a soldering iron with a pencil. We’ll examine the science behind the method, compare its performance to commercial soldering irons, address safety measures, and provide real-world examples. Whether you’re a maker on a budget, a teacher seeking a classroom demonstration, or someone fascinated by DIY electronics, this guide will empower you to create a working soldering tool from items found around the house, while staying safe and informed.
Key Takeaways
- Making a soldering iron with a pencil is feasible using basic household materials, but requires strict adherence to safety protocols.
- The graphite core of a pencil serves as a heating element due to its electrical resistance.
- Homemade soldering irons can be effective for light, low-precision jobs but should not replace commercial tools for critical projects.
- Understanding electrical safety and thermal management is crucial to prevent accidents and equipment damage.
- Real-world examples highlight both the practicality and limitations of pencil-based soldering irons.

Credit: www.youtube.com
The Science Behind Pencil Soldering Irons
Understanding the core principles that make a pencil-based soldering iron work is essential before you attempt to build one. The heart of this concept lies in electrical resistance heating, a phenomenon commonly used in commercial heating devices.
The Role Of Graphite In Conductivity
The graphite core inside a standard pencil is an excellent conductor of electricity, but it also possesses enough resistance to generate heat when an electric current passes through it. Unlike metals, graphite’s resistive properties allow it to heat up quickly and reach temperatures sufficient to melt solder, usually above 180°C (356°F).
- Graphite’s structure: Composed of layers of carbon atoms, graphite conducts electricity via delocalized electrons.
- Heat generation: When electricity flows through the core, resistance transforms electrical energy into thermal energy.
- Thermal stability: Graphite is stable at high temperatures, making it suitable for brief heating applications.
Electrical Resistance And Power Supply
To make a pencil soldering iron, you’ll need to supply a controlled amount of electrical current to the graphite. The power source must be able to provide enough voltage and current to heat the graphite without causing it to break or overheat.
- Voltage and current: Most homemade designs use 5V, 12V DC power adapters or batteries.
- Power calculation: Power (W) = Voltage (V) x Current (A). For soldering, you typically need 5, 15 watts.
How Heat Is Transferred
The heat generated by the graphite core is transferred to the solder and the workpiece. Efficient transfer depends on the size of the graphite, the quality of the contacts, and the type of solder used.
- Contact area: Smaller, sharper graphite tips focus heat better.
- Thermal losses: Poor connections or excessive graphite length can reduce efficiency.
Materials And Tools Needed
A successful pencil soldering iron requires careful selection of materials and tools. Here’s a detailed breakdown of what you’ll need, plus a comparison table for different graphite sources.
Essential Materials
- Standard HB or 2B pencil: Provides the graphite core.
- Two insulated electrical wires (18, 22 AWG): For connecting power.
- DC power supply (5V, 12V, 1, 2A): Such as a phone charger, bench power supply, or battery pack.
- Alligator clips or wire connectors: For safe, temporary connections.
- Heat-resistant handle: Can be made from wood, plastic, or the pencil body itself.
- Electrical tape or heat-shrink tubing: For insulation.
- Solder: Leaded or lead-free, depending on application.
Optional/recommended Tools
- Wire stripper and cutter
- Utility knife or sharpener
- Multimeter: To check voltage and current.
- Safety goggles and gloves
Table: Comparison Of Graphite Sources
| Source | Graphite Purity | Typical Diameter | Suitability |
|---|---|---|---|
| Standard Pencil | ~80% | 2-3 mm | Good for basic soldering |
| Mechanical Pencil Lead | ~90% | 0.5-0.7 mm | Best for fine work, fragile |
| Art Graphite Stick | ~95% | 5-10 mm | High heat, less precise |
Sourcing Components
Most items can be found at home or in local stores. For higher purity graphite, consider art supply stores. Power supplies from old electronics are ideal, but ensure they match the required voltage and current.
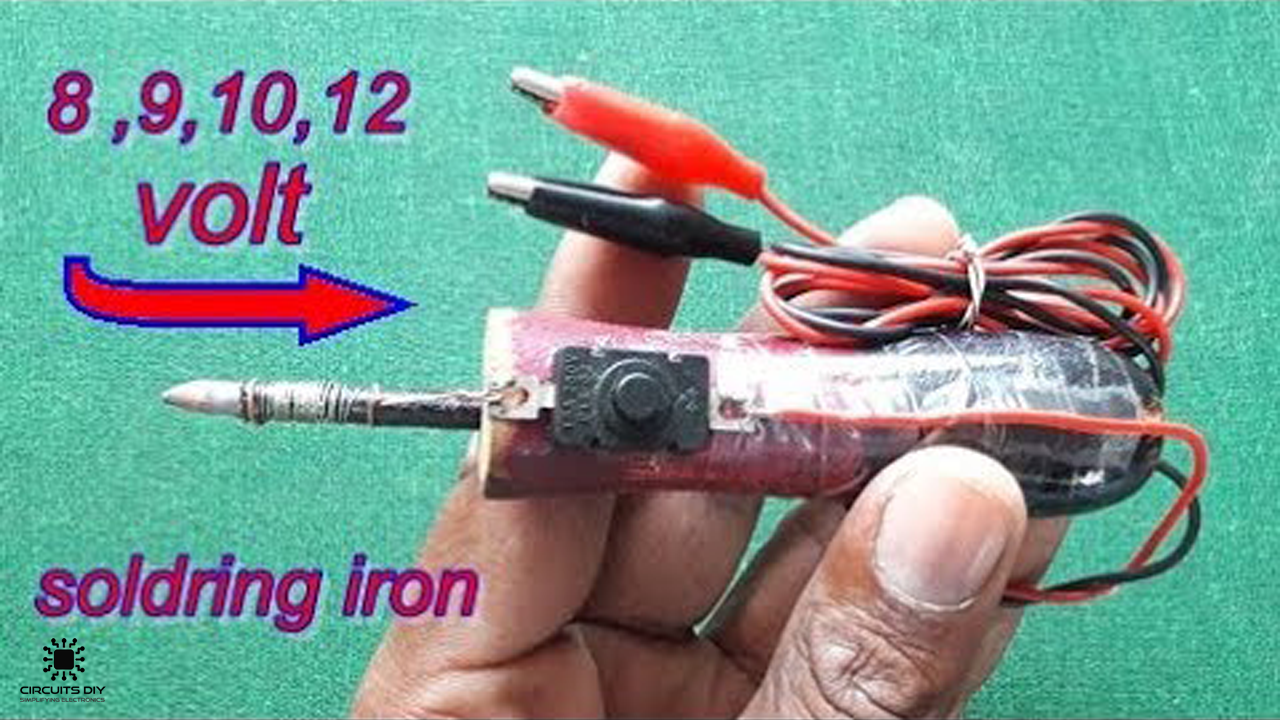
Credit: www.circuits-diy.com
Step-by-step Guide: Making A Soldering Iron With A Pencil
Follow these detailed steps to safely and effectively build your own soldering iron using a pencil.
Step 1: Prepare The Pencil And Extract The Graphite
- Sharpen both ends of the pencil using a knife or sharpener, exposing as much graphite as possible without breaking it.
- Remove the wood casing (optional): Carefully split the pencil lengthwise to extract the graphite core. This is recommended for better contact and heat flow.
- Trim the graphite: Cut it to a length of 3, 5 cm for optimal heating and durability.
Step 2: Attach Electrical Wires
- Strip 1 cm of insulation off both ends of two wires.
- Securely wrap each wire around one end of the graphite core. Use alligator clips if you prefer a removable connection.
- Insulate the connections with electrical tape or heat-shrink tubing, leaving the graphite tip exposed.
Example: In my experience, using alligator clips made it easier to replace broken graphite tips without rebuilding the entire tool.
Step 3: Build The Handle
- Use the pencil’s wood as a heat-resistant handle, or insert the graphite into a wood/plastic tube for insulation.
- Position the graphite so that only 1, 2 cm extends as the tip.
- Secure wires along the handle using tape, ensuring no exposed metal is left.
Step 4: Connect To Power Supply
- Double-check polarity, for DC adapters, match red to positive, black to negative.
- Set the voltage on the power supply (begin with 5V for safety).
- Attach wires from the graphite to the power supply terminals.
Warning: Never plug the device into a wall outlet directly. Always use a low-voltage, current-limited DC source.
Step 5: Testing And First Use
- Switch on the power. The graphite should begin heating within 10, 20 seconds.
- Touch solder to the graphite tip. It should melt easily if the temperature is sufficient.
- Adjust voltage if necessary, but never exceed 12V or 2A to prevent overheating.
Table: Voltage Vs. Heating Performance
| Voltage (V) | Current (A) | Approx. Temp (°C) | Heating Time (sec) | Recommended Use |
|---|---|---|---|---|
| 5 | 0.5 | 150 | 30 | Light soldering, small wires |
| 9 | 1.0 | 250 | 15 | General electronics work |
| 12 | 1.5 | 350 | 10 | Quick soldering, thicker joints |
Step 6: Soldering Tips And Tricks
- Use flux for better solder flow and cleaner joints.
- Clean the graphite tip with sandpaper between uses to remove residue.
- Replace graphite if it cracks or erodes.

Credit: www.youtube.com
Safety Considerations And Precautions
Creating a soldering iron with a pencil involves real electrical and thermal risks. Prioritizing safety is non-negotiable.
Electrical Hazards
- Low-voltage DC only: Never use AC mains or high-voltage supplies.
- Current limitation: Use supplies with built-in current protection.
- No wet environments: Keep the workspace dry and insulated.
Thermal Hazards
- Hot surfaces: The graphite and nearby wires can reach 300°C or more.
- Burn risk: Always hold the insulated handle; never touch the tip during or immediately after use.
- Fire risk: Keep flammable materials away from the work area.
Personal Protective Equipment
- Safety goggles to protect eyes from solder splashes.
- Heat-resistant gloves for added safety.
- Ventilation: Soldering can release fumes; work in a well-ventilated area.
Handling And Storage
- Cool before storage: Allow the device to cool completely before putting it away.
- Secure connections: Loose wires can cause shorts or electric shocks.
- Child safety: Keep homemade devices out of reach of children.
Warning: Homemade soldering irons lack many of the safety features found in commercial products. Use only for light, non-critical work and under supervision if inexperienced.
Performance Comparison: Homemade Vs. Commercial Soldering Irons
While a pencil-based soldering iron is a fascinating DIY project, it’s important to understand how it stacks up against purpose-built tools.
Table: Homemade Vs. Commercial Soldering Iron
| Feature | Pencil-Based Soldering Iron | Commercial Soldering Iron |
|---|---|---|
| Cost | Under $5 | $10, $100+ |
| Temperature Control | Manual (via voltage adjustment) | Precise, often digital |
| Heating Time | 10, 30 seconds | 5, 15 seconds |
| Tip Durability | Low (graphite erodes quickly) | High (iron/nickel-plated tips) |
| Safety Features | None | Grounding, heat insulation, auto shutoff |
| Recommended Use | Light, educational, emergency | All professional and hobby work |
Limitations Of Pencil-based Soldering Irons
- Limited lifespan: Graphite tips wear down or break after a few uses.
- Inconsistent heating: Temperature varies with voltage and graphite condition.
- Lack of precision: Not suitable for sensitive electronics or surface-mount work.
When To Use A Homemade Soldering Iron
- Educational demonstrations: Teaching concepts of electricity and resistance.
- Emergency repairs: When commercial tools are unavailable.
- Budget constraints: For hobbyists or students with limited resources.
Real-world Examples And Case Studies
Homemade pencil soldering irons have been built and used in a variety of settings. Here are three illustrative examples:
Example 1: Classroom Stem Activity
A high school science teacher used pencil-based soldering irons to demonstrate electrical resistance and heat in a classroom setting. Each student constructed their own device with safety supervision. The project helped students visualize how electrical energy transforms into heat and fostered practical electronics skills.
- Outcome: Students successfully soldered simple circuits and gained a hands-on understanding of resistance heating.
Example 2: Maker Workshop On A Budget
In a community makerspace, participants built pencil soldering irons as part of a budget electronics workshop. The focus was on accessible, low-cost tools for basic repairs. While the devices had limitations, they enabled attendees to solder wires and small components, sparking interest in further electronics exploration.
- Outcome: Many makers later upgraded to commercial irons but credited the project with boosting their confidence.
Example 3: Emergency Field Repair
An electronics hobbyist stranded without a soldering iron in a remote location improvised with a pencil, wires, and a USB power bank. The DIY tool was used to reconnect a broken wire in a portable radio, restoring functionality until a proper repair could be made.
- Outcome: The tool’s portability and ease of assembly proved valuable in a pinch, though the graphite tip wore out quickly.
Troubleshooting And Optimization Tips
Building a homemade soldering iron may involve some trial and error. Here are strategies for addressing common issues:
Graphite Not Heating Enough
- Check power supply: Ensure it delivers at least 5V and sufficient current (1A+).
- Reduce graphite length: Shorter cores heat more efficiently.
- Improve connections: Tighten wire wraps and use conductive paste if available.
Overheating And Breakage
- Lower voltage: Excessive heat can cause graphite to crack.
- Upgrade insulation: Add extra layers of electrical tape or use a thicker handle.
Poor Solder Flow
- Apply flux: Improves solder adhesion and flow.
- Clean the tip: Remove oxidized material with fine sandpaper.
Frequent Tip Replacement
- Use higher purity graphite: Art pencils or graphite sticks last longer.
- Reinforce tip: Wrap the base of the graphite with a small metal collar for stability.
Pro Tip: Regularly monitor the condition of the graphite and replace it before it becomes too thin or brittle. A multimeter can help verify that current is flowing properly through the tip.
Enhancing Performance And Customization
For those seeking improved performance or durability, consider these customization ideas:
Adjustable Power Supply
Using a variable-voltage power supply allows you to fine-tune the temperature for different soldering tasks. Digital bench supplies are ideal, but DIY adjustable adapters can also be built from recycled electronics.
Interchangeable Tips
Design your handle and wiring to accept various graphite sizes or shapes. This enables you to swap tips for different applications, such as fine electronics or larger wire joints.
Heat Shields And Stands
Construct a simple stand from non-flammable materials to safely hold the soldering iron when not in use. Adding a heat shield (such as a metal washer near the tip) can protect the handle and user’s fingers.
Integrating A Switch
Add an inline switch to your power circuit for easy on/off control. This increases safety by allowing quick disconnection without unplugging wires.
Environmental Impact And Sustainability
Building a soldering iron from a pencil is not only cost-effective but also minimizes electronic waste by repurposing existing materials.
Reuse And Recycling
- Repurpose old chargers: Using discarded adapters reduces landfill waste.
- Graphite disposal: Graphite is non-toxic and can be discarded with household waste, but avoid burning it.
Reducing E-waste
By extending the life of old electronics through repair, homemade soldering irons promote a circular economy mindset. This hands-on approach encourages users to value repair over replacement and fosters innovation in resource-limited environments.
For more on sustainability in electronics, see EPA’s Sustainable Management of Electronics.
Frequently Asked Questions
What Type Of Pencil Works Best For Making A Soldering Iron?
A standard HB or 2B pencil is effective due to its moderate graphite purity and thickness. However, higher purity graphite, such as that from art pencils or graphite sticks, offers better heat generation and durability.
Can This Homemade Soldering Iron Be Used For Surface-mount Devices (smd)?
While it is possible to solder larger SMD components, the lack of precision and temperature control makes it unsuitable for delicate or high-density SMD work. Commercial soldering irons with fine, temperature-regulated tips are recommended for these applications.
Is It Safe To Power The Pencil Soldering Iron From A Usb Port?
USB ports typically provide 5V at up to 0. 5, 2A, which can work for light-duty soldering. However, some computers may limit current or shut off the port if excessive draw is detected. Using a dedicated USB charger or power bank is safer and avoids risking your computer.
How Long Does A Pencil Soldering Iron Tip Typically Last?
The graphite tip in a homemade soldering iron usually lasts for 10, 30 minutes of cumulative use, depending on power level and handling. Frequent tip replacement is expected due to erosion and breakage. Keeping spare graphite cores on hand is advisable.
Can This Method Be Scaled Up For Heavy-duty Or Professional Soldering?
The pencil-based soldering iron is best suited for educational, emergency, or light hobby use. For heavy-duty or professional applications, commercial irons with robust safety features, temperature regulation, and durable tips are essential. Attempting to scale up the homemade design poses significant safety and reliability risks.
Building a soldering iron with a pencil is a creative and educational project that showcases both the ingenuity of DIY electronics and the importance of safety. While it cannot fully replace commercial tools, it offers a valuable entry point for learning about electrical resistance, heat generation, and sustainable repair. With careful planning and attention to safety, anyone can transform a simple pencil into a functional soldering tool, gaining practical skills and a deeper appreciation for the science behind everyday objects. For a deeper dive into resistance heating, visit Wikipedia: Electric Heating.