
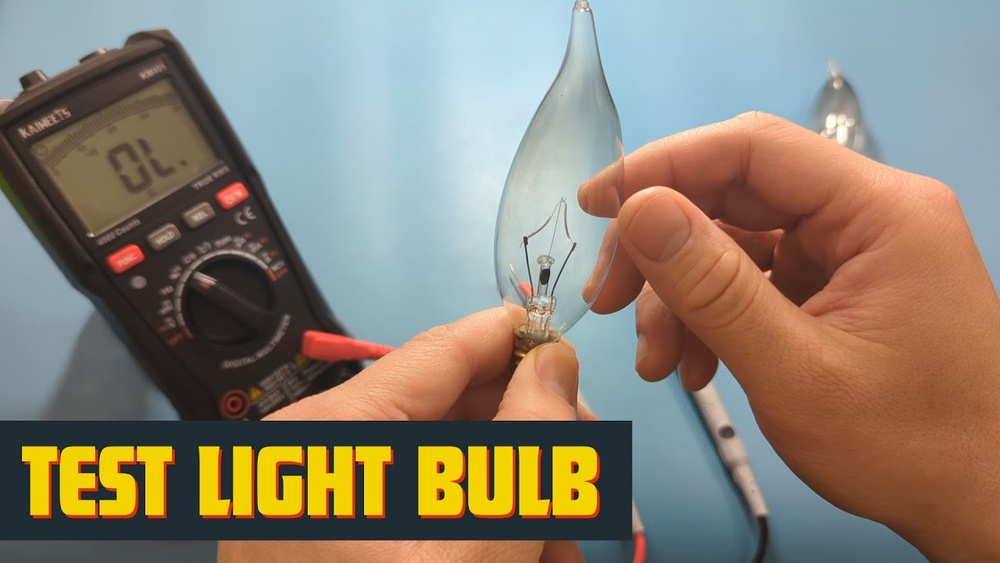
Testing light bulbs with a multimeter is a fundamental skill that bridges the gap between everyday electrical troubleshooting and advanced diagnostics. Whether you’re a homeowner facing a flickering lamp or an electronics enthusiast evaluating circuit components, knowing how to check a bulb’s continuity, resistance, and operational status with a multimeter can save time, money, and frustration.
This guide distills the process into clear, actionable steps, using both beginner-friendly explanations and advanced insights for those seeking deeper understanding.
Light bulbs, though seemingly simple, are foundational to modern life. When a bulb fails, the cause could be as basic as a broken filament or as complex as a wiring issue. Multimeters, which measure voltage, resistance, and continuity, offer a precise way to diagnose such problems.
Used correctly, a multimeter can reveal not just if a bulb is burnt out, but also subtle issues like partial shorts or compromised efficiency, knowledge that empowers users to address problems proactively.
Key Takeaways
- Testing bulbs with a multimeter is safe, accurate, and accessible for beginners.
- The process involves selecting the correct multimeter setting and interpreting resistance or continuity results.
- Understanding test results helps differentiate between a burned-out bulb and other electrical issues.
- Advanced users can analyze filament conditions and bulb efficiency with specialized multimeter functions.
- Real-world examples highlight the value of systematic testing in both home and industrial environments.

Credit: www.wikihow.com
Understanding Bulb Basics And Multimeter Types
Before testing, it’s crucial to grasp how bulbs function and what multimeter types offer for accurate diagnostics.
How Light Bulbs Work
Most household bulbs use a filament (incandescent) or a semiconductor (LED) that emits light when electricity passes through. When the filament is intact, electricity flows, and the bulb lights up. If the filament is broken or the internal circuit is damaged, the bulb won’t function.
Common Bulb Types
- Incandescent bulbs: Simple filament-based; fail when the filament breaks.
- Halogen bulbs: A type of incandescent with halogen gas for longer life.
- CFL (Compact Fluorescent Lamp): Use gas and a fluorescent coating; more complex internal circuits.
- LED bulbs: Use semiconductors; may have internal drivers or resistors.
Multimeter Types Explained
A multimeter is an instrument that measures voltage, current, and resistance. There are two main types:
- Analog multimeter: Uses a needle display; less common but good for visualizing changes.
- Digital multimeter (DMM): Provides clear digital readings; preferred for accuracy and ease of use.
| Multimeter Type | Display | Ease of Use | Best For |
|---|---|---|---|
| Analog | Needle Gauge | Moderate | Visualizing Fluctuations |
| Digital | LCD/LED | Beginner Friendly | Precision Testing |
Pro Tip:
For most users, a digital multimeter is recommended due to its accuracy, safety features, and ease of reading values.

Credit: www.youtube.com
Preparing For The Test: Safety And Setup
Safe and successful bulb testing begins with proper preparation.
Essential Tools And Equipment
- Digital multimeter (preferably auto-ranging for beginners)
- Bulb to be tested (removed from fixture)
- Protective gloves (for handling hot or broken bulbs)
- Screwdriver (if bulb needs to be removed from a socket)
Safety Precautions
- Always disconnect power to the circuit or lamp before removing the bulb.
- Allow hot bulbs to cool before handling.
- Inspect bulbs for visible damage or broken glass.
- Never test a bulb while it is still screwed into a powered socket.
Setting Up Your Multimeter
- Turn on the multimeter.
- Set it to the resistance (Ω) or continuity mode.
- Insert the black probe into the COM port and the red probe into the VΩmA port.
- Test the multimeter by touching the two probes together, the display should show close to zero ohms or beep (continuity).
Example:
When I tested a 60W incandescent bulb, I found the resistance to be about 15 ohms, a sign of a healthy filament.

Credit: www.youtube.com
Step-by-step Guide: How To Check A Bulb With A Multimeter
Follow these clear steps to determine if your bulb is working or faulty.
Step 1: Remove The Bulb And Inspect
- Unscrew the bulb from the fixture.
- Check for obvious signs of damage: Dark spots, broken filaments, or cloudiness.
Step 2: Select The Correct Multimeter Setting
- For incandescent and halogen bulbs, use the resistance (Ω) or continuity mode.
- For CFL and LED bulbs, resistance testing is less definitive, but continuity mode can sometimes indicate internal failures.
Step 3: Connect The Probes
- Touch one probe to the base of the bulb and the other to the side contact (for screw-type bulbs).
- For pin-based bulbs (like some CFLs), touch each probe to a pin.
Step 4: Interpret The Results
- Low resistance (typically 1-100 ohms): Bulb is likely good (exact value depends on wattage).
- No reading or infinite resistance (OL): Filament is broken or circuit is open, bulb is faulty.
- Very high resistance (above 1 megaohm): Possible internal fault; bulb may be unreliable.
| Bulb Type | Expected Resistance (Ω) | Interpretation |
|---|---|---|
| Incandescent (60W) | 10, 20 | Good |
| Halogen (50W) | 8, 15 | Good |
| CFL | Varies/High | Check continuity |
| LED | Very High/OL | Check continuity/driver |
Step 5: Additional Tests For Advanced Users
- For LED bulbs, test both directions: Reverse polarity to check internal diodes.
- For CFL bulbs, check across the pins for continuity; an open circuit often means a failed internal fuse or filament.
Warning:
Never test bulbs for resistance or continuity while connected to live power. Risk of shock or damage is high.
Interpreting Results: What Your Multimeter Is Telling You
Reading your multimeter’s display is only half the battle; knowing what those numbers mean is key.
Understanding Continuity Tests
Continuity mode emits a beep if the circuit is closed. For bulbs:
- Beep: Filament is intact.
- No beep: Filament is broken, bulb is bad.
Analyzing Resistance Values
- Lower resistance correlates with higher wattage bulbs.
- Higher resistance in low-wattage bulbs is normal.
- OL (Over Limit): Indicates an open circuit, bulb is blown.
Real-world Example
A user tested a 100W incandescent bulb and found 10 ohms, matching expectations for a good bulb. A second bulb read OL, confirming it was burned out.
Advanced Insights
- For specialty bulbs (e.g., projector or automotive), consult manufacturer datasheets for typical resistance.
- Some bulbs display a brief low resistance that climbs, this can indicate a failing filament.
When Readings Are Ambiguous
- Slight resistance but no light: Bulb may have partial shorts or other faults.
- Flickering bulbs may pass continuity but fail in real use, test in-circuit with care.
Troubleshooting Common Problems And Advanced Scenarios
Testing bulbs with a multimeter can reveal more than just simple failures.
Diagnosing Partial Shorts And Intermittent Failures
- A bulb that tests as “good” but flickers or dims may have a partially broken filament.
- Gently tapping the bulb (while unpowered) and retesting can reveal intermittent issues.
Testing Bulbs In Series Or Fixtures
- For multi-bulb fixtures, remove and test each bulb individually.
- If all bulbs test “good” but the fixture won’t light, check the socket or wiring.
Evaluating Bulbs With Complex Electronics (cfl, Led)
- Testing CFLs: A continuity test across the pins can catch failed filaments, but internal electronics may mask some faults.
- Testing LEDs: Multimeters with a diode test mode can sometimes light a single LED faintly, indicating function.
Example:
A technician found a CFL bulb that appeared undamaged but failed continuity testing across the pins, internal fuse had blown.
Advanced Multimeter Features
Some high-end multimeters offer:
- Capacitance testing: Useful for advanced diagnostics on CFLs.
- Diode mode: Helpful for LED bulbs and advanced troubleshooting.
Pro Tip:
If you suspect subtle failures, test the bulb in a known good fixture after multimeter testing for confirmation.
Case Studies And Real-world Applications
Understanding practical scenarios enhances troubleshooting skills and confidence.
Case Study 1: Homeowner Diagnosing Flickering Lamp
A homeowner noticed a bedside lamp flickering. After removing the bulb and testing with a digital multimeter, they found infinite resistance, the filament had failed. Replacing the bulb restored normal function, saving the cost and hassle of unnecessary electrician visits.
Case Study 2: Automotive Technician Evaluating Signal Lights
An automotive technician faced repeated failures in a vehicle’s signal light. Using a multimeter, the technician tested both the bulb and the socket. The bulb tested good (low resistance), but the socket showed no voltage, diagnosing a wiring fault rather than a bulb issue.
Case Study 3: Electronics Hobbyist Testing Led Arrays
An electronics hobbyist built a custom LED array. When some LEDs failed to light, the hobbyist used the diode test mode to check each LED. Several showed open circuits, indicating failed diodes. The faulty LEDs were replaced, restoring full function.
Case Study 4: Facility Manager Handling Bulk Bulb Replacement
A facility manager in a school tested dozens of bulbs removed during a scheduled maintenance. Using a multimeter, they identified several with high resistance but not open, suggesting aging filaments. These bulbs were proactively replaced, preventing future outages.
Advanced Tips And Professional Techniques
For users seeking to refine their approach or handle specialized scenarios, these strategies provide deeper insight.
Multi-range Resistance Testing
- Use different resistance ranges to capture subtle changes in filament condition, especially for high-wattage bulbs.
Diagnosing Dimmable And Smart Bulbs
- Smart bulbs may not show continuity due to complex internal circuitry; use functional testing in addition to resistance checks.
- For dimmable LEDs, expect higher resistance and non-linear readings, consult the manufacturer’s specs.
Testing Bulbs In Circuits
- For advanced users, voltage testing across a bulb socket (with power ON and bulb removed) can confirm if the fixture is delivering correct voltage.
- Always exercise caution and use insulated probes.
Identifying Ghost Loads
- Some bulbs, especially LEDs, may “glow” faintly when off due to residual voltage in the circuit.
- Test for voltage at the socket with a multimeter to confirm if “ghost voltage” is present.
Pro Tip:
Keep a log of multimeter readings for different bulb types and wattages. Over time, this data helps identify outlier values that signal aging or failing bulbs.
Data Table: Comparison Of Bulb Test Results By Type And Condition
This table summarizes typical resistance or continuity outcomes for various bulb types and failure modes.
| Bulb Type | Condition | Resistance (Ω) | Continuity | Next Step |
|---|---|---|---|---|
| Incandescent | Good | 10, 20 | Yes | Safe to Use |
| Incandescent | Blown | OL/Infinite | No | Replace Bulb |
| Halogen | Good | 8, 15 | Yes | Safe to Use |
| Halogen | Blown | OL/Infinite | No | Replace Bulb |
| CFL | Good | Varies/High | Possible | Test in Fixture |
| LED | Good | Very High | Possible | Test with Diode Mode |
Common Mistakes And How To Avoid Them
Even experienced users can make errors when testing bulbs. Here’s how to sidestep the most frequent pitfalls.
Forgetting To Disconnect Power
Testing bulbs while in the socket or with live power risks electric shock and meter damage. Always power down and remove bulbs before testing.
Using The Wrong Multimeter Setting
Selecting voltage instead of resistance or continuity can yield confusing results. Double-check the dial before testing.
Misinterpreting High Resistance
Some users mistake high resistance for an open circuit. Consult typical values for your bulb type and wattage.
Overlooking Socket And Fixture Issues
If bulbs test good but won’t light, the problem may lie in the fixture wiring or socket. Use your multimeter to check for voltage at the socket.
Example:
A DIY enthusiast repeatedly replaced “bad” bulbs, only to discover via multimeter that the fixture socket had corroded contacts.
Frequently Asked Questions
What Is The Safest Way To Test A Bulb With A Multimeter?
The safest approach is to ensure the bulb is removed from any powered socket before testing. Set your digital multimeter to the resistance or continuity setting, and handle the bulb with gloves to avoid cuts from broken glass. Always verify your meter’s function by touching the probes together first.
Can You Test All Types Of Bulbs With A Multimeter?
You can test most bulbs, but the results and methods vary. Incandescent and halogen bulbs provide clear continuity or resistance readings. CFL and LED bulbs may require additional checks (like diode or capacitance modes) or functional testing in a fixture, as their internal electronics can complicate direct resistance checks.
Why Does An Led Bulb Show High Resistance Or No Continuity?
LED bulbs contain internal drivers and electronic components that do not behave like simple filaments. As a result, a standard resistance or continuity test may show very high resistance or no continuity, even if the bulb works. If your multimeter has a diode mode, use it to test across the LED contacts, or test the bulb in a known good fixture.
What Should I Do If The Bulb And Socket Both Test As Good But The Light Still Doesn’t Work?
If both the bulb and socket deliver expected readings, the issue may lie elsewhere, such as in the wiring, wall switch, or breaker. Check for voltage at the socket with the power ON (using extreme caution), and consider consulting a licensed electrician for complex or inaccessible wiring issues.
Is It Worth Repairing A Bulb That Fails The Multimeter Test?
For most household bulbs, especially incandescent or halogen types, repair is not cost-effective. However, specialty or high-value bulbs (such as projector lamps or automotive lights) may be worth investigating further. In rare cases, cleaning contacts or replacing an internal fuse may restore function, but most users are better served by replacing failed bulbs.
With a firm grasp of both foundational and advanced techniques, you’re now equipped to diagnose bulb failures with confidence. Consistent use of a multimeter not only clarifies the cause of lighting issues but also supports proactive maintenance and efficient troubleshooting. For further reading, visit the Fluke Multimeter Guide or consult the Wikipedia entry on Multimeters for in-depth technical details. Mastering this essential skill ensures brighter, safer, and more reliable spaces, whether at home, in the workshop, or on the job.