

Testing a 9V battery is a fundamental skill for anyone handling electronics, whether you’re troubleshooting a smoke detector, checking a guitar pedal, or maintaining a collection of remote controls. Yet, many beginners feel uncertain about using a multimeter, one of the most versatile tools in any toolkit. At the same time, advanced users appreciate the nuances of battery health, load testing, and interpreting results beyond a simple voltage reading. This guide is crafted to bridge both worlds: offering step-by-step, beginner-friendly instructions while providing deeper insights and advanced recommendations for those who want to master battery diagnostics.
Understanding how to test a 9V battery with a multimeter isn’t just about knowing if a battery is dead or alive. The process reveals the battery’s true condition, helps prevent device malfunctions, and saves money by distinguishing between batteries that need replacement and those that are still serviceable.
Whether you’re a hobbyist, technician, or a curious homeowner, learning the right method empowers you to maintain your devices efficiently and safely.
Key Takeaways
- Testing a 9V battery with a multimeter is simple and requires only basic tools and precautions.
- The process involves measuring the battery’s voltage under no-load and, for advanced users, with a load to assess real-world performance.
- Knowing standard voltage ranges helps you distinguish between good, weak, and dead batteries.
- Real-world examples and comparison tables illustrate how to interpret test results accurately.
- Advanced techniques like load testing and internal resistance measurement offer deeper insights but require additional care and understanding.
- Safety and proper handling are essential throughout the process, especially when dealing with rechargeable or lithium-based batteries.
Understanding 9v Batteries: Types And Typical Applications
9V batteries are widely used in a variety of household and professional devices due to their convenient size and reliable voltage output. However, not all 9V batteries are created equal. Understanding the differences can help you make informed decisions about testing and replacement.
Common 9v Battery Types
Alkaline: The most common type, found in household devices like smoke detectors and toys. They offer a nominal voltage of 9 volts and are known for their affordability and decent shelf life.
Lithium: These provide a longer lifespan and more stable voltage output. They are often used in critical devices, such as wireless microphones and medical equipment.
Rechargeable (NiMH): Nickel-Metal Hydride batteries can be recharged hundreds of times and are suitable for high-drain devices. Their nominal voltage is typically around 8.4 volts when fully charged.
Typical Applications
- Smoke detectors
- Guitar pedals and effects units
- Multimeters and small electronics
- Wireless microphones
- Remote controls
- Medical devices
Battery Characteristics At A Glance
| Type | Nominal Voltage | Common Use | Capacity (mAh) | Rechargeable |
|---|---|---|---|---|
| Alkaline | 9V | Household devices | 500-600 | No |
| Lithium | 9V | Critical electronics | 1000-1200 | No |
| NiMH Rechargeable | 8.4V | High-drain devices | 150-300 | Yes |
Pro Tip: Always check your device’s manual for recommended battery types. Using an incorrect battery may affect performance or even damage your equipment.

Credit: www.youtube.com
Essential Tools And Safety Precautions
Before you begin testing a 9V battery, it’s vital to gather the right tools and observe basic safety protocols. This ensures accurate results and prevents accidents, especially for beginners who may be unfamiliar with electrical measurements.
Required Tools
- Digital multimeter (recommended for beginners due to ease of use)
- Analog multimeter (works as well, but requires manual needle reading)
- 9V battery (the unit you wish to test)
- Alligator clip leads (optional, for hands-free testing)
- Load resistor (for advanced load testing, typically 470Ω or 1kΩ, 1/4 watt)
Safety Guidelines
- Inspect your multimeter for damage, especially on the leads and casing.
- Set the multimeter to the correct mode (DC voltage) before connecting to the battery.
- Do not short-circuit the battery terminals, this can cause rapid discharge or heating.
- Avoid contact with battery terminals to prevent static discharge.
- Dispose of leaking or damaged batteries following local regulations.
Preparing Your Workspace
- Work on a clean, dry, and non-conductive surface.
- Keep metal objects away from your work area to avoid accidental shorts.
- Make sure your hands are dry and free from oils or conductive substances.
Warning: Never attempt to open or disassemble a 9V battery, as this can be hazardous. Always recycle spent batteries at an approved facility.

Credit: www.youtube.com
Step-by-step Guide: Testing A 9v Battery With A Multimeter
Testing a 9V battery is straightforward, but accuracy requires attention to each step. Here’s a comprehensive guide for both beginners and advanced users.
Step 1: Setting Up Your Multimeter
- Turn on the multimeter and select the DC voltage (V, ) setting.
- Set the voltage range to 20V if your multimeter is not auto-ranging.
- Confirm that the black probe is in the COM port and the red probe in the VΩmA port.
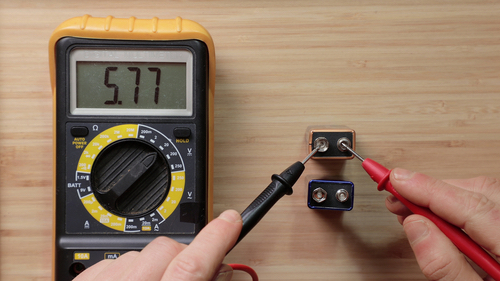
Step 2: Measuring Battery Voltage (no Load)
- Hold the black probe against the battery’s negative terminal.
- Hold the red probe against the positive terminal.
- Observe the reading on the display. A new 9V alkaline battery should measure between 9.0V and 9.5V.
- Record the voltage.
Step 3: Interpreting Results
- Above 8.5V: Battery is in good condition.
- Between 7.0V and 8.5V: Battery is weak but may still function in low-drain devices.
- Below 7.0V: Battery is likely dead or unusable for most devices.
Step 4: Advanced Load Testing (optional)
For a more accurate assessment, advanced users can test the battery under load.
- Connect a 470Ω resistor in parallel with the battery terminals.
- Repeat the voltage measurement as before.
- Note the voltage drop. A healthy battery should not drop more than 0.5V under load.
Example: When I tested a 9V alkaline battery that read 8.9V without a load, the voltage dropped to 7.8V with a 470Ω resistor. This indicated the battery was still serviceable, but nearing the end of its optimal life.
Step 5: Testing Rechargeable 9v Batteries
- Fully charged NiMH 9V batteries typically read 8.4V to 8.6V.
- If the reading is below 7.5V, recharge the battery and retest.
- Persistent low voltage after charging often means the battery has reached end of life.
Troubleshooting Common Errors
- No reading: Check probe placement and battery orientation.
- Negative reading: Probes are reversed, swap black and red.
- Fluctuating readings: Ensure firm contact and steady hands.
Pro Tip: For frequently used devices, label batteries with the date and voltage after testing to track their health over time.
Credit: tameson.com
Real-world Examples And Case Studies
Nothing illustrates the value of proper battery testing like real-life scenarios. Here are three examples from different contexts, showing how testing with a multimeter saves time, money, and frustration.
Example 1: Smoke Detector Failure
A homeowner noticed their smoke detector chirping intermittently, even after replacing the battery. Using a multimeter, they discovered the “new” 9V battery measured only 7.2V, well below the recommended threshold. Replacing it with a fully charged battery (9.3V) solved the issue instantly.
Lesson: Always check new batteries before installation, as shelf life and storage conditions can affect voltage.
Example 2: Guitar Pedal Signal Drop
A guitarist experienced weak sound output from a pedal. The battery, though not visibly old, read 8.2V without load and dropped to 6.8V under a 470Ω resistor. The pedal required a minimum of 7.5V to function properly. Swapping in a fresh battery restored the full signal and performance.
Lesson: Load testing reveals true battery capability under real-world conditions.
Example 3: School Science Project
A student used a 9V battery to power a small motor for a school project. Initially, the motor ran well, but performance dropped after several hours. Testing showed the battery had 7. 9V left, which explained the decrease in speed.
After replacing the battery, the project continued smoothly.
Lesson: Regular voltage checks help maintain consistent performance, especially in educational or experimental setups.
Voltage Ranges, Battery Health, And Device Compatibility
Understanding voltage ranges and how they relate to battery health is crucial. Devices have different voltage requirements, and knowing these helps you make better decisions about battery replacement.
Standard Voltage Ranges For 9v Batteries
| Voltage Reading | Battery Condition | Device Suitability |
|---|---|---|
| 9.0 – 9.5V | Excellent (New) | All devices |
| 8.5 – 8.9V | Good | Most devices |
| 7.0 – 8.4V | Weak | Low-drain devices |
| <7.0V | Dead | Replace immediately |
Device Voltage Requirements
- Smoke detectors: Require at least 8.5V for reliable operation.
- Guitar pedals: Often need 8.0V or higher.
- Remote controls: Can sometimes function with voltages as low as 7.0V.
Factors Affecting Battery Life And Performance
- Temperature: Extreme heat or cold reduces battery efficiency.
- Discharge rate: High-drain devices deplete batteries faster.
- Storage conditions: Batteries stored in humid or hot environments deteriorate quicker.
When To Replace Vs. Recharge
- Single-use batteries: Replace if voltage drops below 7.0V.
- Rechargeable batteries: Recharge when voltage falls below 7.5V, replace if unable to hold charge after multiple cycles.
Pro Tip: Keep a simple log of voltage readings and replacement dates for critical devices to anticipate failures before they happen.
Advanced Techniques: Load Testing And Internal Resistance
For users seeking a deeper understanding of battery health, additional tests can provide a more accurate picture than voltage readings alone.
Load Testing Explained
A load test measures the battery’s voltage under a simulated real-world load, such as a resistor. This helps identify batteries that appear healthy under no-load but fail during actual use.
How To Perform A Load Test
- Connect a 470Ω resistor across the battery terminals.
- Measure the voltage as described previously.
- Compare the loaded voltage to the no-load voltage.
Interpretation: A significant voltage drop (more than 0.5V) indicates high internal resistance and a battery nearing end of life.
Measuring Internal Resistance
Internal resistance increases as batteries age, reducing their ability to deliver current.
Steps To Estimate Internal Resistance
- Record the battery voltage with no load (V1).
- Connect a known resistor (e.g., 470Ω) across the terminals and record the loaded voltage (V2).
- Calculate the current: I = (V1 – V2) / R.
- Internal resistance (Rint) = (V1 – V2) / I.
Example Calculation:
- V1 (no load) = 9.2V
- V2 (loaded) = 8.7V
- R = 470Ω
- I = (9.2 – 8.7) / 470 = 0.00106A
- Rint = (9.2 – 8.7) / 0.00106 ≈ 472Ω
High internal resistance means the battery can’t deliver power efficiently, even if voltage appears adequate.
Best Practices For Advanced Testing
- Always use resistors rated for the expected power dissipation.
- Avoid prolonged load testing, as this can accelerate battery depletion.
- Document your findings for future reference.
Pro Tip: Load testing is especially useful for rechargeable batteries, which may show normal voltage but rapidly drop in performance due to increased internal resistance.
Multimeter Selection And Comparison
Choosing the right multimeter is essential for accurate and safe battery testing. Both digital and analog models have their merits, but for most users, a digital multimeter is preferable.
Digital Vs. Analog Multimeters
| Feature | Digital Multimeter | Analog Multimeter |
|---|---|---|
| Display | Numeric LCD/LED | Needle & scale |
| Accuracy | High | Moderate |
| Ease of Use | Beginner-friendly | Requires skill |
| Price Range | $15, $100+ | $10, $60 |
| Portability | Compact options available | Usually bulkier |
Features To Look For
- Auto-ranging: Simplifies voltage selection.
- Backlit display: Helpful in low-light conditions.
- Data hold: Allows you to freeze readings for easy recording.
- Durability: Rubber housing or protective case for field use.
Recommended Brands
- Fluke: Known for professional-grade reliability.
- Klein Tools: Offers robust models for both pros and hobbyists.
- AstroAI: Affordable options with solid performance for beginners.
Example: In my experience, a digital multimeter with auto-ranging and a clear display makes battery testing much faster and less error-prone, especially when working with multiple devices.
Maintenance Tips
- Replace multimeter batteries regularly to avoid inaccurate readings.
- Store in a dry place to prevent corrosion.
- Inspect leads for wear or damage before each use.
Warning: Never attempt to measure current (amperage) directly from a battery unless you are certain of your multimeter’s rating and configuration. Doing so incorrectly can damage the meter or cause injury.
Environmental Impact And Safe Disposal
Testing and replacing 9V batteries responsibly is not only good practice, it’s essential for environmental protection. Improper disposal can harm ecosystems and public health.
Environmental Concerns With 9v Batteries
- Alkaline batteries: Can leak potassium hydroxide, which is corrosive.
- Lithium batteries: Pose a fire hazard if punctured or exposed to water.
- Rechargeable batteries: Contain metals that are recyclable but hazardous if landfilled.
Proper Disposal Methods
- Use municipal recycling programs for household batteries.
- Deposit used batteries at retail collection points (many hardware and electronics stores offer recycling bins).
- Store spent batteries in a safe, dry container until disposal.
Reducing Battery Waste
- Switch to rechargeable 9V batteries for frequently used devices.
- Remove batteries from devices during long storage to prevent leakage.
- Test batteries before disposal to maximize their usable life.
Regulatory Guidelines
The U.S. Environmental Protection Agency (EPA) provides guidance on battery disposal and recycling. For more information, visit the EPA’s official battery recycling page.
Pro Tip: Never throw 9V batteries in the trash. Even seemingly dead batteries can still hold a charge and may spark fires in waste facilities.
Frequently Asked Questions
What Happens If I Reverse The Multimeter Probes On The Battery?
If you accidentally reverse the red and black probes, most digital multimeters will simply display a negative voltage reading. This does not harm the multimeter or the battery. Analog meters, however, may show the needle moving in the opposite direction, so always ensure correct probe placement to avoid confusion.
Can I Test A 9v Battery While It Is Installed In A Device?
Testing a battery while installed is possible, but results may be skewed by the device’s internal circuitry. For the most accurate measurement, remove the battery from the device before testing. If you must test in-circuit, note that some devices may introduce additional resistance or load, affecting the voltage reading.
How Often Should I Test 9v Batteries In Critical Devices?
For devices like smoke detectors or medical equipment, test batteries at least every six months. Some organizations, such as the National Fire Protection Association, recommend checking smoke detector batteries monthly. Regular testing ensures that batteries are replaced before failure, maintaining safety and reliability.
What Are Signs That A 9v Battery Is Leaking Or Unsafe To Test?
Warning signs include corrosion around the terminals, a swollen casing, or any visible liquid or white crystalline deposits. If you notice these, do not test or use the battery. Dispose of it following your local hazardous waste guidelines, and wash your hands after handling.
Is It Possible To Revive A Dead 9v Battery?
While some online sources claim that freezing or recharging non-rechargeable batteries can temporarily boost output, this is not recommended and may be hazardous. Once a 9V battery falls below the recommended voltage range and cannot power your devices, it should be replaced or recycled. Attempting to revive single-use batteries can cause leaks or rupture.
Testing 9V batteries with a multimeter is an essential skill for anyone working with electronics, from beginners to seasoned technicians. Understanding the differences between battery types, knowing how to interpret voltage readings, and applying advanced techniques like load testing allows you to maintain your devices more effectively and safely. Always prioritize safety, follow proper disposal methods, and consider the environmental impact of battery use. For further reading on battery technology and testing procedures, resources such as the Wikipedia 9-volt battery article provide detailed technical insights. With the knowledge gained from this guide, you’ll be equipped to assess 9V batteries confidently, extend device lifespans, and contribute to responsible electronics maintenance.