

Testing a battery charger with a multimeter is a vital skill for anyone handling batteries, whether for cars, electronics, or household devices. Faulty chargers can cause significant inconvenience, safety risks, or even permanent damage to batteries and equipment. Yet, many people are unsure of how to properly check their charger’s functionality, often relying on guesswork or incomplete information.
With the right approach and tools, anyone, from beginners to seasoned technicians, can confidently and accurately test a battery charger’s performance.
This comprehensive guide will walk you through the entire process, from understanding charger types to step-by-step testing procedures, troubleshooting, and advanced diagnostic techniques. Real-world examples and practical tips will help you bridge theory with practice. By the end, you’ll be equipped to verify charger safety, spot potential issues, and extend the life of your batteries and devices.
Key Takeaways
- Using a multimeter is the most reliable way to test if a battery charger is working correctly.
- Understanding the type of charger and its specifications is crucial before testing.
- Step-by-step instructions and safety tips ensure accurate and safe testing for both beginners and advanced users.
- Advanced diagnostics can reveal subtle issues, such as voltage instability or ripple, that basic tests may miss.
- Troubleshooting common problems helps avoid unnecessary charger replacements and battery failures.

Credit: www.youtube.com
Understanding Battery Chargers: Types, Output, And Specifications
Before testing, it’s essential to understand what kind of battery charger you’re working with. Different chargers have unique operating principles, voltages, and current outputs. Testing methods may vary based on these characteristics.
Common Types Of Battery Chargers
- Linear Chargers: Provide a constant voltage or current and are typically used for smaller devices.
- Switch-Mode Chargers: More efficient, often found in modern car chargers and electronics.
- Smart Chargers: Use microprocessors to optimize charging and prevent overcharging.
- Trickle Chargers: Supply a very low current for maintaining battery charge over long periods.
- Fast Chargers: Deliver higher current for rapid charging but require precise control to avoid damaging the battery.
Key Specifications To Note
- Output Voltage: The rated voltage the charger provides (e.g., 12V, 5V).
- Output Current: Maximum current available (e.g., 1A, 10A).
- Input Voltage: Usually the mains supply (e.g., 120V AC).
- Supported Battery Type: Lead-acid, NiMH, Li-ion, etc.
Reading The Charger Label
All essential data is typically printed on the charger’s label or in the manual. Look for:
- Voltage (V)
- Current (A or mA)
- Polarity (especially for DC chargers)
- Model and safety certifications
| Charger Type | Typical Voltage | Typical Current | Battery Compatibility |
|---|---|---|---|
| Linear | 1.5V, 12V | 100mA, 2A | AA/AAA, Small Devices |
| Switch-Mode | 5V, 24V | 500mA, 10A | Cars, Laptops, Power Tools |
| Smart | Varies (Programmable) | Varies | Modern Electronics, Li-ion |
| Trickle | 6V, 12V | 0.5A, 2A | Car/Motorcycle, Standby Use |
| Fast | 5V, 12V | 2A, 10A | Phones, Power Banks |
Example: Identifying Charger Specs
Suppose you have a 12V, 1.5A car battery charger. The label reads: “Input: 120V AC 60Hz, Output: 12V DC 1.5A.” This means you should expect 12V DC at the output terminals when testing with a multimeter.
Essential Tools And Safety Precautions
Using the right tools and following safety best practices is non-negotiable, especially when working with electricity. Even low-voltage chargers can cause harm if mishandled.
Required Tools
- Digital Multimeter (with DC and AC voltage settings)
- Alligator Clip Leads (for hands-free testing)
- Protective Gloves and Goggles
- Notebook or App (to record readings)
Choosing The Right Multimeter
Multimeters come in a wide range of prices and features. For testing battery chargers, ensure your multimeter can measure:
- DC Voltage up to at least 24V
- AC Voltage up to 250V (for charger input)
- Current (optional, for advanced diagnostics)
| Multimeter Feature | Budget Model | Professional Model |
|---|---|---|
| Voltage Range | Up to 600V | Up to 1000V |
| Accuracy | ±1.0% | ±0.1% |
| Display | Analog or Basic Digital | Large, Backlit Digital |
| Additional Functions | Basic (V, Ω) | Temperature, Frequency, Data Logging |
Safety Precautions
- Always unplug the charger before connecting or disconnecting test leads.
- Check the condition of cables and probes to avoid short circuits.
- Wear protective gloves and goggles, especially for high-current chargers.
- Avoid metal jewelry that could cause accidental shorts.
- If unsure about a step, consult a professional or refer to the charger’s manual.
Pro Tip:
When testing high-current chargers (e. g. , for cars or industrial batteries), stand clear of the battery itself in case of accidental sparks or overheating.
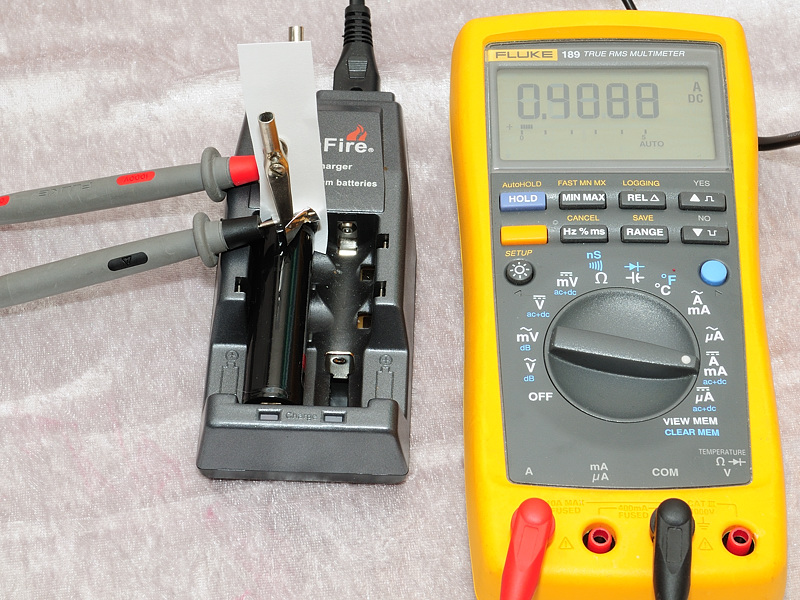
Credit: lygte-info.dk
Step-by-step Guide: Testing A Battery Charger With A Multimeter
This section details how to test your battery charger safely and accurately, whether you’re a beginner or seeking advanced diagnosis.
Preparing For The Test
- Disconnect the battery from the charger to avoid false readings and potential hazards.
- Set up your workspace on a non-conductive surface with good lighting.
- Check the multimeter’s battery and functionality with a known voltage source (like a fresh AA battery).
Step 1: Inspect The Charger And Cables
Before powering on:
- Visually check for cracks, melted plastic, or frayed wires.
- Wiggle connectors gently to check for loose contacts.
Step 2: Set Up The Multimeter
- Switch the multimeter dial to DC Voltage (V⎓), since most chargers output DC.
- Select a range higher than the charger’s rated output (e.g., for a 12V charger, use the 20V or 200V setting).
Step 3: Measure The Output Voltage
- Plug in the charger (without connecting to any battery).
- Touch the black probe to the charger’s negative/ground terminal.
- Touch the red probe to the positive terminal.
- Read the voltage on the multimeter display.
For a 12V charger, the reading should be around 12V (often slightly higher, like 12. 4V, 13. 8V, depending on charger design).
Example: Testing A 12v Car Battery Charger
When I tested a basic 12V charger, the unloaded output read 13. 2V, within the typical range for charging lead-acid batteries.
Step 4: Check For Polarity
- If the reading is negative, reverse the probes.
- Consistent polarity ensures compatibility with your battery.
Step 5: Test Under Load (advanced)
For a more accurate assessment:
- Connect a test battery or a suitable resistor (dummy load) to the charger.
- Repeat the voltage measurement with the load connected.
- Observe voltage drop, a significant drop may indicate a weak charger.
Step 6: Measure Output Current (optional)
- Set the multimeter to the current (A⎓) setting.
- Connect the multimeter in series between the charger and battery (consult your manual for correct procedure).
- Compare the measured current to the charger’s rated output.
Step 7: Check For Ac Ripple (advanced)
- Switch the multimeter to AC Voltage while the charger is running.
- Measure across the output terminals; a reading above 0.1V AC suggests excessive ripple, which can damage batteries.
Example: Diagnosing A Laptop Charger
A friend suspected their laptop charger was failing. Using a multimeter, the no-load voltage was 19.5V as specified. However, under load, it dropped to 16V, and the laptop wouldn’t charge consistently. The culprit: worn internal components unable to maintain voltage.
Step-by-step Checklist (for Quick Reference)
- [ ] Inspect charger and cables
- [ ] Select correct multimeter range
- [ ] Measure no-load output voltage
- [ ] Confirm polarity
- [ ] Test with load (optional but recommended)
- [ ] Measure output current (for advanced users)
- [ ] Check for AC ripple (for sensitive electronics)

Credit: www.wikihow.com
Interpreting Results And Diagnosing Common Charger Problems
Understanding what your multimeter readings mean is as important as the testing process itself. This section helps you interpret numbers and troubleshoot common charger issues.
Typical Output Voltage Ranges
- 12V Charger: 12.4V, 14.4V (no load), 12.0V, 13.5V (under load)
- 6V Charger: 6.5V, 7.5V (no load), 6.0V, 7.0V (under load)
- USB Charger: 4.9V, 5.3V
Common Issues And What They Mean
1. No Voltage Output
- Likely causes: Blown fuse, faulty transformer, broken wire.
- Action: Check fuse, inspect internals (if safe), or replace charger.
2. Low Output Voltage
- Causes: Component degradation, overheating, poor contact.
- Action: Clean contacts, allow cooling, or seek repair.
3. High Output Voltage
- Causes: Failed regulation, wrong charger for battery.
- Action: Do not use, risk of battery damage.
4. Voltage Drops Under Load
- Causes: Weak power supply, undersized charger, failing components.
- Action: Replace charger or check compatibility.
5. Excessive Ac Ripple
- Causes: Failed filter capacitors (in switch-mode chargers).
- Action: Avoid use for sensitive electronics; repair or replace charger.
| Problem | Possible Cause | Recommended Action |
|---|---|---|
| No Output | Blown fuse, internal break | Check fuse, inspect internals, replace |
| Low Voltage | Component wear, heat | Let cool, check connections |
| High Voltage | Faulty regulator | Do not use, seek repair |
| Voltage Drops Under Load | Undersized charger, failing parts | Check compatibility, replace |
| High Ripple | Bad capacitors | Repair/replace charger |
Example: Diagnosing A Trickle Charger
A motorcycle owner found their battery repeatedly drained. Testing revealed the charger output only 11.2V (should be 13V+). The issue: an internal resistor failed, reducing voltage. Replacing the charger solved the battery drain.
Warning:
Never attempt to repair high-voltage or sealed chargers unless you have proper training. Mains voltage exposure can be lethal.
Advanced Diagnostic Techniques And Tips For Professionals
Experienced technicians and enthusiasts may want to dig deeper into charger diagnostics. Advanced testing can reveal subtler issues that impact battery life and device safety.
Using An Oscilloscope For Ripple And Noise
- Oscilloscopes provide a visual waveform of the charger’s output.
- Detects high-frequency noise or voltage spikes that a multimeter might miss.
- Particularly relevant for switch-mode and smart chargers.
Load Testing With Electronic Loads
- Simulate real battery loads precisely.
- Set specific current draws and observe voltage stability.
- Useful for verifying fast chargers and high-capacity power supplies.
Temperature Checks
- Use an infrared thermometer to monitor charger temperature during operation.
- Overheating may indicate internal faults or insufficient ventilation.
Data Logging And Long-term Monitoring
- Professional multimeters and data loggers can record voltage/current over time.
- Helps spot intermittent faults or output fluctuations.
Example: Professional Shop Diagnostics
In a professional repair shop, chargers are often tested using both a multimeter and an oscilloscope. A charger that passes voltage tests but shows high-frequency spikes on the oscilloscope is flagged as unsafe for sensitive equipment, even if it appears fine to the average user.
Pro Tip:
For repeat testing, label your chargers with the date of last test and the measured output. This creates a quick reference and can help track declining performance over time.
Real-world Examples And Case Studies
Applying theory to real-life scenarios helps cement the process and highlights practical considerations.
Case Study 1: Home Electronics Charger
A user’s tablet charger stopped working. Multimeter testing revealed no voltage at the output, but the input fuse was intact. Opening the charger (after unplugging!) Showed a cracked solder joint. Resoldering restored the output, saving the cost of a new charger.
Case Study 2: Automotive Battery Maintenance
A car owner noticed slow cranking even after overnight charging. The multimeter showed 11. 8V output from the charger, too low for effective charging. Upgrading to a higher-quality, regulated charger restored normal battery function.
Case Study 3: Industrial Battery Banks
In an industrial setting, periodic testing of forklift battery chargers prevents costly downtime. Technicians log each charger’s voltage and ripple values monthly. Early detection of out-of-spec chargers has reduced battery replacement costs by up to 20%, according to maintenance records.
Best Practices For Charger Maintenance And Accurate Testing
Proper care and routine testing extend the life of both chargers and batteries. Here’s how to keep your equipment in peak condition.
Regular Inspection And Cleaning
- Check cables and connectors for wear, corrosion, or debris.
- Clean contacts with isopropyl alcohol.
Periodic Testing
- Schedule quarterly testing of all chargers, especially in critical applications.
- Record all readings for trend analysis.
Store Properly
- Keep chargers in a dry, cool location away from direct sunlight.
- Coil cables loosely to prevent internal wire breakage.
Use The Right Charger For Each Battery
- Always match voltage and current ratings to battery specifications.
- Consult the manufacturer’s documentation for compatibility.
Dispose Of Faulty Chargers Responsibly
- Take to an e-waste recycling center.
- Never discard electronics in regular trash, batteries and chargers contain hazardous materials.
Pro Tip:
If you notice any unusual heat, smell, or noise from a charger, discontinue use immediately and test before further use.
Frequently Asked Questions
How Can I Test A Battery Charger If I Don’t Have A Multimeter?
While a multimeter is the most accurate tool, you can perform a basic test using a test lamp or LED (for low-voltage chargers). Connect the lamp or LED to the charger output, if it lights up, the charger is delivering voltage. However, this won’t provide precise voltage or current readings, and it won’t detect issues like excessive ripple or voltage instability.
Is It Safe To Test A Charger With The Battery Connected?
Testing with the battery connected can provide more realistic load readings but also increases risk if the charger or battery is faulty. For beginners, it’s best to start with no-load tests (charger alone). If you do test under load, ensure the battery is in good condition and use proper safety gear. Always connect the charger to the battery before plugging into mains power to avoid sparks.
What Causes A Charger To Output The Wrong Voltage?
Common reasons include component aging, damaged regulators, or using the charger with incompatible mains voltage. Environmental factors such as heat and moisture can accelerate component failure. Regular testing helps catch these issues early, preventing battery damage and safety hazards.
Can A Faulty Charger Damage My Battery?
Yes, overvoltage can overcharge and damage cells, while undervoltage may cause incomplete charging or sulfation (in lead-acid batteries). Excessive ripple can harm sensitive electronics. It’s essential to use a charger that matches the battery’s specifications and to test chargers periodically for safe operation.
Are There Chargers That Can’t Be Tested With A Standard Multimeter?
Some smart chargers or chargers with complex charging profiles may require specialized diagnostic tools or proprietary software for full testing. While a multimeter can verify basic output, it may not capture timed charging cycles, communication signals, or detailed current profiles. For such equipment, consult the manufacturer’s guidance or service documentation.
Regular testing of battery chargers with a multimeter not only ensures device longevity but also enhances safety for users and equipment alike. By following the steps and best practices outlined in this guide, you can confidently assess charger health, troubleshoot issues, and make informed decisions about maintenance or replacement. Whether you’re a beginner or a professional, adopting these habits will pay off in reliable performance and peace of mind. For further reading on electronics safety, visit Wikipedia: Multimeter or check your charger’s manufacturer site for model-specific advice such as Fluke Multimeter Guide.