
Testing a motorcycle battery is a skill every rider should have in their toolkit. A healthy battery is the heart of your motorcycle’s electrical system, powering the ignition, lights, and all electronic accessories. Yet, many riders find themselves stranded by a dead battery, often because of skipped or improper maintenance.
Learning to use a multimeter to check your battery is not only beginner-friendly but also empowers you to prevent unexpected breakdowns, save money, and extend your battery’s lifespan.
Whether you’re a new rider curious about basic maintenance or an experienced motorcyclist seeking to diagnose elusive electrical issues, mastering this procedure offers clear benefits. This guide will walk you step by step through testing your motorcycle battery with a multimeter.
Along the way, you’ll find practical tips, data-backed insights, and advanced troubleshooting advice, all explained in accessible language. By the end, you’ll be able to confidently assess your battery’s health and make smarter maintenance decisions.
Key Takeaways
- A multimeter is the most accurate and accessible tool for testing motorcycle batteries at home.
- Proper testing involves checking both static voltage (engine off) and cranking voltage (while starting).
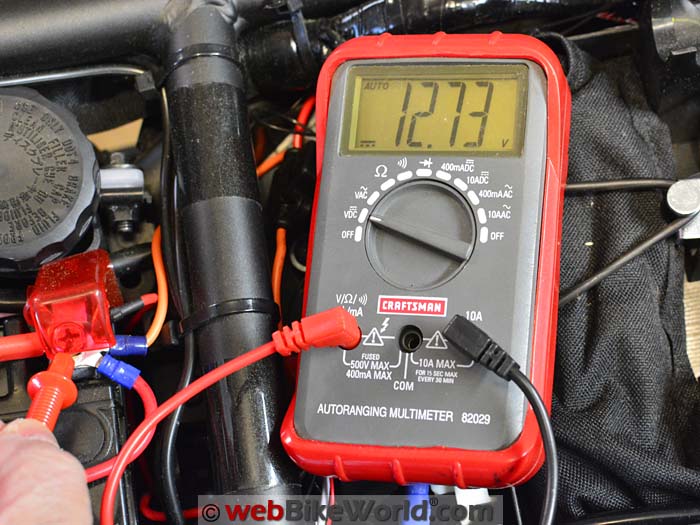
- A healthy 12V motorcycle battery typically reads 12.6V, 12.8V fully charged; below 12.4V indicates possible issues.
- Regular battery checks can prevent breakdowns and costly repairs.
- Advanced troubleshooting includes load testing and checking for parasitic drains.
- Safety precautions, like wearing gloves and avoiding sparks, are crucial when working with batteries.
Credit: blog.adina.com.br
Understanding Motorcycle Batteries
Motorcycle batteries are more than just energy storage, they’re central to reliable engine starts and safe riding. Before testing, it’s important to understand the types of batteries you might encounter and their characteristics.
Types Of Motorcycle Batteries
Most motorcycles use one of these battery types:
- Lead-acid (flooded): Traditional, affordable, require periodic topping up with distilled water.
- AGM (Absorbed Glass Mat): Sealed, maintenance-free, more resistant to vibration and leakage.
- Gel-cell: Use a gel electrolyte, sealed, more tolerant to deep discharges, but sensitive to overcharging.
- Lithium-ion (LiFePO4, etc. ): Lightweight, high performance, longer lifespan, require specific chargers.
Each battery type has different voltage profiles and maintenance needs. Always consult your owner’s manual for manufacturer recommendations.
Battery Ratings And What They Mean
Understanding key battery specifications helps in interpreting your multimeter readings:
- Voltage (V): Indicates electrical potential. Most motorcycles use 12V systems.
- Amp-hour (Ah): Capacity to deliver a steady current over time.
- Cold Cranking Amps (CCA): Maximum current the battery can deliver at low temperatures.
Example: A typical 12V, 10Ah, 180CCA battery is common in midsize motorcycles.
Signs Your Battery Needs Testing
Common indicators of battery trouble include:
- Slow engine cranking
- Dim headlights
- Clicking sounds when starting
- Frequent jump-starts
- Dashboard warning lights
Pro Tip: If you notice these symptoms, test your battery before replacing it. Sometimes the issue lies elsewhere in the electrical system.
Tools And Safety Precautions
Testing a motorcycle battery is straightforward, but safety should always come first. Using the right tools and following safe practices prevents accidents and protects your motorcycle.
Essential Tools For Battery Testing
- Digital multimeter: Accurate and easy to read; analog versions work but are less precise.
- Protective gloves and eyewear: Batteries can leak acid or emit harmful gases.
- Battery terminal brush: For cleaning contacts if needed.
- Notebook or smartphone: To record voltage readings for future reference.
Optional advanced tools:
- Battery load tester: For stress-testing the battery’s ability to handle real-world loads.
- Clamp meter: For measuring current draw (useful for parasitic drain tests).
Preparing For The Test
Before you begin:
- Turn off the motorcycle and remove the key.
- Allow the battery to rest for at least 30 minutes after running or charging. This prevents “surface charge” from skewing results.
- Locate the battery. Most are under the seat or side panel.
- Inspect for corrosion or loose connections. Clean terminals with a brush if necessary.
- Check for swelling or leaks, replace the battery if you see these signs.
Safety Tips
- Always work in a well-ventilated area to avoid inhaling fumes.
- Never allow metal tools to bridge battery terminals, this can cause dangerous short circuits.
- Avoid open flames and sparks near the battery.
- Dispose of old batteries at certified recycling centers.
Warning: Battery acid can cause serious burns. Wear gloves and eye protection, and wash hands thoroughly after handling.

Credit: www.youtube.com
Step-by-step Guide: How To Test A Motorcycle Battery With A Multimeter
Testing your battery with a multimeter involves several distinct checks. Each step reveals important information about your battery’s condition.
Setting Up The Multimeter
- Select DC Voltage Mode: Set the multimeter to 20V DC range.
- Connect the probes: Red probe to the multimeter’s VΩmA port, black probe to the COM port.
- Zero the multimeter: Touch probes together, the reading should be zero or close to it.
Measuring Static Voltage (engine Off)
This test shows the battery’s state of charge.
- Place the red probe on the positive (+) terminal and the black probe on the negative (, ) terminal.
- Read the voltage display.
Use the following table to interpret your results:
| Voltage Reading (V) | Battery Condition | Action Required |
|---|---|---|
| 12.6, 12.8 | Fully charged | None |
| 12.4, 12.5 | Partially charged | Recharge soon |
| 12.1, 12.3 | Low charge | Recharge immediately |
| 11.9 or below | Discharged or faulty | Replace or investigate further |
Example: When I tested my own AGM battery, a reading of 12.3V indicated it was time for a top-up charge.
Performing A Cranking Voltage Test
This test measures the battery’s ability to deliver power under the load of starting the engine.
- Keep the multimeter probes connected as above.
- Have a helper attempt to start the engine while you watch the voltage.
- Observe the lowest voltage during the cranking process.
Healthy batteries typically maintain at least 9.6V during cranking. If the voltage drops below this, the battery may be weak or failing.
Pro Tip: A cranking voltage below 9.6V often signals either a battery near the end of its life or excessive starter draw.
Checking Charging System Voltage (engine Running)
To ensure your alternator and regulator/rectifier are working:
- Start the engine and let it idle.
- Measure voltage at the battery terminals.
- Gradually increase engine RPM to around 3,000.
- Voltage should rise to 13.5, 14.5V. Higher or lower readings indicate charging system issues.
| Engine State | Expected Voltage (V) | Possible Issue |
|---|---|---|
| Engine Off | 12.6, 12.8 | None |
| Idle | 13.0, 14.2 | Low = weak alternator High = regulator issue |
| 3,000 RPM | 13.5, 14.5 | Low/High = charging fault |
Advanced Battery Load Test
For a deeper diagnosis, simulate a real-world load:
- Use a dedicated battery load tester or a high-resistance load (consult manufacturer instructions).
- Apply the load for 10, 15 seconds.
- Monitor voltage, should not drop below 9.6V.
Warning: Prolonged load testing can damage weak batteries. Perform this test only as needed.

Credit: www.revzilla.com
Interpreting Your Results
Understanding what your multimeter readings mean is key to taking the right action. This section will guide beginners through basic interpretation and offer advanced suggestions for trickier cases.
What Static Voltage Reveals
- 12.6V, 12.8V: Battery is healthy and fully charged.
- 12.4V, 12.5V: Usable, but recharge soon.
- 12.1V, 12.3V: Needs recharging; consider checking for charging system issues.
- Below 12.0V: May indicate a failing battery or parasitic drain.
Assessing Cranking Voltage
A significant drop (below 9.6V) while cranking suggests:
- Battery nearing end-of-life
- Starter motor drawing excessive current
- Poor terminal connections
Pro Tip: If your static voltage is good but cranking voltage is low, suspect the starter or electrical connections, not just the battery.
Evaluating Charging System Performance
- Voltage stays low (<13V) when running:Check alternator and regulator/rectifier.
- Voltage exceeds 15V: Regulator may be faulty, risking battery damage.
Advanced Troubleshooting: Parasitic Drain
Sometimes, a battery loses charge due to hidden current draws (parasitic drains) from alarms, clocks, or faulty wiring.
Steps to test for parasitic drain:
- Set the multimeter to DC amps mode.
- Disconnect the negative battery terminal.
- Place the multimeter’s red probe on the negative cable, black probe on the battery’s negative post.
- Observe the current draw (should be less than 0.05 amps for most motorcycles).
If you find a higher draw, systematically remove fuses to isolate the problematic circuit.
Example: Real-world Diagnosis
A 2018 Yamaha MT-07 owner reported repeated dead batteries. Static voltage read 12. 7V, but cranking dropped to 8. 5V. Further inspection revealed a corroded starter cable. Cleaning and tightening the connection restored healthy cranking voltage and reliable starts.
Real-world Examples And Case Studies
Learning from real experiences can be invaluable, especially when diagnosing tricky battery issues.
Example 1: The Case Of The Phantom Drain
A rider with a 2015 Honda CBR500R found the battery dead after a week of non-use. Static voltage was 11. 8V. After recharging, the battery quickly lost power again. Using the multimeter’s current setting, a 0. 2-amp draw was discovered even with the ignition off.
Removing fuses revealed an aftermarket alarm system was the culprit. After disconnecting it, the battery held charge as expected.
Example 2: Agm Battery Vs. Lithium-ion Performance
A comparison between a standard AGM battery and a modern lithium-ion replacement highlighted key differences:
| Feature | AGM Battery | Lithium-ion Battery |
|---|---|---|
| Weight | ~7 lbs | ~2 lbs |
| Static Voltage (Full) | 12.7V | 13.2, 13.4V |
| Cranking Voltage | ~10V | ~12V |
| Lifespan | 3, 5 years | 5, 8 years |
| Cost | $50, $120 | $100, $300 |
Pro Tip: Lithium-ion batteries require compatible chargers and careful winter storage, but offer higher performance and lighter weight.
Example 3: Diagnosing A Weak Charging System
A rider’s 2010 Suzuki V-Strom exhibited dimming lights at idle. Battery voltage with the engine running stayed at 12. 1V, never rising above static voltage. A multimeter test at the alternator output confirmed low voltage, leading to a regulator/rectifier replacement, restoring correct charging function.
Common Mistakes And Best Practices
Even experienced riders can make errors when testing or interpreting battery health. Avoid these pitfalls for more accurate results and longer battery life.
Common Mistakes
- Testing immediately after riding or charging: Surface charge can inflate readings.
- Incorrect multimeter setting: Always use the DC voltage mode, not AC.
- Misreading probes: Reversing red and black probes won’t harm the battery but will produce negative readings.
- Neglecting terminal cleanliness: Corroded connections can mimic bad battery symptoms.
- Overlooking the charging system: Sometimes the battery is fine, the real issue is with the alternator or regulator.
Best Practices
- Test regularly: Every 3, 6 months, or before/after winter storage.
- Keep terminals clean: Use a brush and apply dielectric grease to prevent corrosion.
- Store batteries properly: For long-term storage, use a smart charger or battery maintainer.
- Document readings: Tracking voltage over time helps spot early signs of aging.
Pro Tip: Invest in a quality multimeter, accurate readings make all the difference.
When To Replace Your Battery
Most motorcycle batteries last 3, 5 years with proper care. Signs that it’s time for replacement include:
- Repeated low voltage despite charging
- Visible swelling, leaks, or cracks
- Inability to maintain voltage under load
Always recycle old batteries responsibly, many retailers offer take-back programs.
Advanced Tips For Prolonging Battery Life
With a few extra steps, you can maximize your battery’s lifespan and reliability, saving money and hassle.
Smart Charging And Maintenance
- Use a smart charger (trickle or float) for long-term storage.
- Never use a car charger on motorcycle batteries, it can overcharge and damage them.
- For lithium-ion batteries, use a charger specifically designed for them.
Managing Accessory Loads
- Install LED lighting to reduce electrical load.
- Use a relay for high-draw accessories like heated grips or auxiliary lights.
- Avoid leaving accessories powered when the engine is off.
Monitoring Battery Health Digitally
Many modern bikes support Bluetooth battery monitors, these plug into the terminals and provide smartphone alerts for low voltage or charging issues.
Upgrading Battery Technology
Consider switching to AGM or lithium-ion for better vibration resistance, lower weight, and longer life, especially for high-performance or adventure motorcycles.
Pro Tip: Always check compatibility with your motorcycle’s charging system before upgrading battery types.
Environmental Considerations
- Store batteries in a cool, dry place, heat accelerates aging.
- Avoid deep discharges; recharge promptly after starting difficulties.
- For seasonal storage, disconnect the battery or use a maintainer.
Frequently Asked Questions
How Often Should I Test My Motorcycle Battery?
It’s best to test your battery every 3, 6 months, especially before and after periods of non-use (like winter storage). More frequent testing is recommended if you notice symptoms like slow cranking or dim lights.
Can I Use A Multimeter To Test A Lithium-ion Motorcycle Battery?
Yes, but be aware that fully charged lithium-ion batteries often read between 13.2V and 13.4V, which is higher than lead-acid types. Use the manufacturer’s specifications for interpretation. Also, ensure your multimeter can safely read up to 15V for these batteries.
What Is The Difference Between A Battery Load Test And A Voltage Test?
A voltage test measures the battery’s open-circuit (static) voltage, indicating its state of charge. A load test simulates the real-world demand of starting the engine, revealing how well the battery can deliver current under stress. Load testing is more revealing for identifying weak batteries.
How Can I Tell If My Motorcycle’s Charging System Is The Problem, Not The Battery?
If your battery tests healthy but quickly loses charge after riding, or the voltage doesn’t rise to 13.5, 14.5V with the engine running, the issue may lie in the alternator or regulator/rectifier. Testing voltage at various engine speeds will help pinpoint charging system faults.
Where Can I Find More Detailed Information About Motorcycle Battery Care?
For in-depth technical guidance, visit the Wikipedia Vehicle Battery page or consult your motorcycle’s service manual. For battery recycling and safety, the U.S. EPA Battery Recycling Guide is a reliable resource.
A healthy motorcycle battery is the foundation of worry-free riding. By learning to test your battery with a multimeter, you take control of your motorcycle’s reliability and safety. With the right tools, regular checks, and a few advanced tricks, you’ll avoid breakdowns, extend battery life, and ride with confidence, no matter your level of experience.