
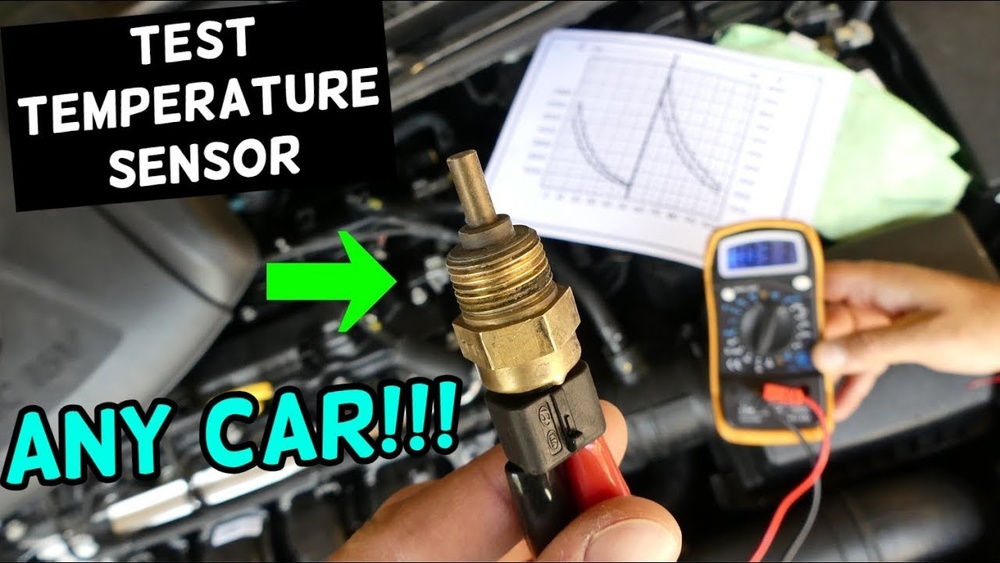
Testing your vehicle’s coolant temperature sensor (CTS) with a multimeter is a crucial diagnostic skill for both DIY enthusiasts and advanced technicians. The coolant temp sensor directly impacts fuel injection, engine timing, and emissions controls. If it fails, your vehicle might experience poor fuel economy, hard starting, or even engine damage. Learning how to properly test this sensor can save you time and money, help you avoid unnecessary part replacements, and develop your diagnostic confidence.
Many car owners overlook the importance of the coolant temperature sensor, or assume only a professional can check it. The good news is that with a basic multimeter, some patience, and a systematic approach, you can accurately diagnose a faulty sensor. This guide provides a comprehensive, beginner-friendly walkthrough, while also offering advanced troubleshooting tips for seasoned enthusiasts. Whether you’re just getting started with automotive diagnostics or you want to refine your process, this article will serve as your trusted reference.
Key Takeaways
- The coolant temp sensor is essential for engine performance, fuel efficiency, and emissions.
- Testing with a multimeter involves measuring resistance (ohms) at different temperatures.
- Basic tools needed: Digital multimeter, thermometer, and access to the sensor.
- Common symptoms of a faulty sensor include poor MPG, rough idle, and hard starts.
- Advanced tips include voltage checks and using live data for high-precision diagnostics.
- Always consult your vehicle’s service manual for specific sensor values.
Understanding The Coolant Temperature Sensor
The coolant temperature sensor, often called the Engine Coolant Temperature (ECT) sensor, monitors the temperature of the engine’s coolant. This data is sent to the Engine Control Unit (ECU), which adjusts fuel injection, ignition timing, and idle speed accordingly.
How The Coolant Temp Sensor Works
Most coolant temp sensors are thermistors, specifically Negative Temperature Coefficient (NTC) types. As the coolant temperature rises, the sensor’s resistance decreases. The ECU interprets these resistance changes as temperature readings, using them to fine-tune engine operation.
Importance In Modern Vehicles
Modern engines rely heavily on accurate coolant temperature readings for:
- Fuel mixture adjustments: Cold engines require a richer mixture; as the engine warms, the mixture leans out.
- Emission controls: Incorrect readings can lead to increased emissions and failed inspections.
- Engine protection: Overheating can be detected early, preventing severe damage.
Common Symptoms Of A Faulty Sensor
A failing coolant temp sensor can cause:
- Poor fuel economy
- Check Engine Light activation
- Rough idle or hard starts
- Overheating or temperature gauge issues
- Black smoke from the exhaust (running rich)
If you notice these symptoms, testing your sensor is a logical next step.

Credit: www.youtube.com
Tools And Preparation
Before testing, gather the right tools and take necessary safety precautions. This ensures both accurate results and your personal safety.
Essential Tools
- Digital multimeter (with ohms and voltage settings)
- Thermometer (infrared or probe, for reference)
- Socket set or wrench (to remove the sensor, if necessary)
- Protective gloves and eyewear
- Service manual (for your specific vehicle’s resistance specs)
Locating The Coolant Temp Sensor
The sensor is typically threaded into the engine block or cylinder head, near the thermostat housing. Consult your manual or look for a small, two-wire sensor near the top radiator hose.
Vehicle Preparation Steps
- Engine Off and Cool: Never work on a hot engine, let it cool to avoid burns.
- Disconnect Battery: For added safety when unplugging sensors.
- Access the Sensor: You may need to remove engine covers or air intake components.
Warning: Opening the cooling system on a hot engine can cause severe burns. Always wait until the system is cool before removing any components.

Credit: www.youtube.com
Step-by-step Guide: Testing The Coolant Temp Sensor
Let’s break down the process for both beginners and advanced users, using clear steps and explanations.
Step 1: Identify Sensor Terminals
Locate the two terminals or pins on the sensor. If your sensor only has one wire, the body grounds through the engine.
Step 2: Measure Resistance (ohms) At Room Temperature
- Set your multimeter to the ohms (Ω) setting.
- Disconnect the sensor’s wiring harness.
- Place one probe on each terminal.
- Note the resistance value.
Compare this value to the specification in your service manual (e. g. , 2,000, 3,000 Ω at 20°C/68°F).
Step 3: Heat Test The Sensor
You can test the sensor response by simulating engine warming:
- Place the sensor in a cup of hot water (not boiling).
- Use the thermometer to monitor water temperature.
- Measure resistance at several temperatures: Cold (room temp), warm (about 40°C/104°F), and hot (about 80°C/176°F).
- Record each reading.
Example: In my experience, a typical sensor shows ~2,500 Ω at room temperature, dropping to under 300 Ω at 80°C.
Step 4: Compare With Manufacturer Specs
Check your readings against the vehicle’s service manual. Deviations greater than 10, 20% may indicate a failing sensor.
Step 5: Advanced Voltage Test (on-vehicle)
For advanced users:
- Reconnect the sensor and back-probe the connector (insert the probe alongside the wire without disconnecting).
- Set the multimeter to DC volts.
- Turn the ignition ON (engine off).
- Observe voltage, typical range is 5V supply; signal voltage drops as the engine warms up.
- Monitor voltage changes as the engine heats up.
Voltage should decrease smoothly with rising temperature, typically from around 3, 4V (cold) to below 1V (hot).
Step 6: Interpret Results
- Flat resistance or voltage (no change with temperature): Sensor is likely faulty.
- Infinite resistance: Indicates an open circuit.
- Short to ground: Very low or zero resistance.
Example: Case Study
A 2010 Toyota Camry owner reported rough cold starts. Testing the ECT sensor revealed:
- 2,400 Ω at 20°C (within spec)
- 320 Ω at 80°C (within spec)
- Signal voltage dropped from 3.7V to 0.8V as engine warmed
Result: The sensor was functioning correctly. The issue lay elsewhere.

Credit: www.wikihow.com
Data-driven Comparison: Sensor Values
Below is a sample table comparing typical resistance values for popular car models. Always check your specific manual for exact specs.
| Temperature (°C) | Toyota Camry (Ω) | Honda Accord (Ω) | Ford Focus (Ω) |
|---|---|---|---|
| 0 | 5,000 | 4,800 | 5,200 |
| 20 | 2,400 | 2,300 | 2,500 |
| 40 | 1,100 | 1,050 | 1,200 |
| 80 | 300 | 320 | 340 |
Common Mistakes And Troubleshooting
Even seasoned technicians can overlook simple steps or misinterpret results. Here’s how to avoid common pitfalls.
Not Allowing Engine To Cool
Testing the sensor with the engine hot can be dangerous and yield inaccurate readings. Always start with a cold engine for the most reliable baseline resistance.
Ignoring Connector And Wiring Issues
Sometimes, the sensor is fine but wiring or connector corrosion causes problems. Always inspect the harness and clean terminals before testing.
Using The Wrong Multimeter Setting
Selecting AC volts or the wrong resistance range can result in misleading readings. Double-check your multimeter settings before each measurement.
Overlooking Reference Values
Don’t guess, use the specifications for your exact make and model. Even small resistance differences can affect modern ECUs.
Example: Case Study
A Ford Focus owner replaced the sensor twice, but the issue persisted. It was later found that a damaged wire near the connector was causing intermittent open circuit readings.
Advanced Diagnostic Tips
For those seeking deeper diagnostic insights, these advanced methods can help pinpoint elusive issues.
Using Live Data With An Obd-ii Scanner
Many scanners display real-time coolant temperature readings. Compare the scanner’s temperature to the actual coolant temperature (measured with a thermometer at the radiator or engine).
- Discrepancy >5°C may indicate a sensor or wiring problem.
Checking Reference Voltage And Ground
Measure the voltage at the sensor connector with the sensor unplugged. You should see a steady 5V reference from the ECU and good ground on the other pin.
Testing Signal Line To Ecu
With the sensor connected, probe the signal wire at the ECU pin. This tests for any voltage drop or signal loss between the sensor and ECU.
Simulating Sensor Faults
For trainers or advanced troubleshooting, you can substitute resistors of known values in place of the sensor to verify ECU and wiring response.
Pro Tip: Always record your readings and compare them to historical data for the same vehicle. This can reveal subtle sensor degradation over time.
Sensor Replacement Vs. Cleaning
Sometimes, a sensor is just dirty or contaminated. Here’s when to clean and when to replace.
Cleaning The Sensor
- Remove the sensor and inspect for deposits or corrosion.
- Clean gently with electrical contact cleaner.
- Reinstall and retest.
When To Replace
- Cracked, physically damaged, or corroded sensors should be replaced.
- If resistance or voltage readings are out of spec, replacement is recommended.
Example: Case Study
A 2012 Honda Accord showed erratic temperature readings. Cleaning the corroded sensor terminals fixed the problem, replacement was not needed.
| Condition | Action |
|---|---|
| Contaminated but functional | Clean and retest |
| Physically damaged | Replace |
| Out-of-spec readings | Replace |
| Connector corrosion | Clean terminals |
How To Interpret Multimeter Readings
Understanding what the numbers mean is as important as the test itself.
Reading Resistance Values
- Higher resistance at low temperatures
- Lower resistance at high temperatures
- No resistance (open circuit): Sensor is faulty
- Very low resistance: Possible short
Reading Voltage Values
- High voltage (cold engine): Around 3, 4V typical
- Low voltage (hot engine): Below 1V
- No change: Sensor or wiring issue
Using Data For Diagnostics
If your readings are within the expected range and change smoothly with temperature, your sensor is working properly. Use the data to rule out other causes of engine issues.
Real-world Examples
Here are three real-world scenarios illustrating the value of proper coolant temp sensor testing.
Example 1: Hard Cold Starts In A Subaru Outback
A Subaru owner reported hard cold starts and high idle speed. Testing the CTS revealed high resistance at all temperatures, nearly 10,000 Ω at room temp. Replacing the sensor restored normal starting and idle.
Example 2: Poor Fuel Economy In A Vw Jetta
A VW Jetta owner noticed poor MPG. Live data showed the coolant temp reading stuck at -40°C, even though the engine was warm. Testing revealed an open circuit in the sensor. Replacing it fixed the issue.
Example 3: Overheating Alarm In A Ford F-150
A Ford F-150 triggered frequent overheating alarms. The sensor tested within spec, but the connector was loose, causing intermittent open readings. Securing the connector resolved the false alarms.
Data Table: Faulty Vs. Good Sensor Readings
| Test Condition | Good Sensor | Faulty Sensor |
|---|---|---|
| Room Temp (20°C) | 2,000, 3,000 Ω | 10,000 Ω (open) / 0 Ω (short) |
| Hot (80°C) | 200, 400 Ω | No change / erratic |
| Voltage (cold engine) | 3, 4V | No reading / stuck high or low |
| Voltage (hot engine) | <1V | No change / erratic |
Tips For Accurate Testing
- Use a quality multimeter for reliable readings.
- Check your vehicle’s manual for specific sensor values.
- Test at multiple temperatures to verify sensor response.
- Clean connectors and inspect wiring before concluding sensor failure.
- Record all readings for future reference.
Pro Tip: If your readings are borderline, test a new sensor side-by-side for comparison.
When To Seek Professional Help
While testing with a multimeter is straightforward, some issues require advanced diagnostics:
- Intermittent faults that only occur under certain conditions
- ECU or wiring harness problems
- Multiple sensor failures
In these cases, a professional technician with diagnostic tools can provide a more thorough analysis.
For detailed technical information, reference the official Wikipedia: Coolant Temperature Sensor page or your vehicle manufacturer’s service literature.
Frequently Asked Questions
What Happens If I Drive With A Faulty Coolant Temp Sensor?
Driving with a bad sensor can cause the ECU to run a rich or lean fuel mixture, resulting in poor fuel economy, increased emissions, and potential engine damage over time. In some vehicles, it can also trigger limp mode, reducing performance for safety.
Can A Faulty Coolant Temp Sensor Cause Overheating?
The sensor itself doesn’t cause overheating, but a bad reading may prevent cooling fans from activating or mislead the ECU, which can contribute to overheating. Always verify the sensor and related systems if you suspect cooling issues.
Is It Safe To Test The Sensor Without Removing It From The Engine?
Yes, you can test the sensor in place using the voltage or resistance method (with the engine off and cool). Back-probe the connector or use the exposed terminals, but ensure you follow safety guidelines to avoid burns or electrical shorts.
How Often Should I Check My Coolant Temp Sensor?
There’s no set interval, but it’s wise to test the sensor during routine cooling system maintenance or if you notice symptoms like poor starting, rough idle, or unexplained temperature readings. Consult your service manual for your vehicle’s recommendations.
Can I Use A Universal Coolant Temp Sensor?
Universal sensors can fit some vehicles, but they may not provide the exact resistance curves required by your ECU. Always match the replacement sensor to your vehicle’s specifications for best results. When in doubt, use OEM parts or consult a professional mechanic.
For more information on sensor diagnostics and repair, see the comprehensive guide from AutoBest UK.
Testing your coolant temperature sensor with a multimeter is a skill that pays dividends in accurate diagnostics and vehicle reliability. Whether you’re a beginner following step-by-step instructions or an advanced user employing live data and voltage tests, a methodical approach ensures you get meaningful results.
With regular checks and careful attention to detail, you’ll catch sensor issues early, saving on repairs and keeping your engine running smoothly.