
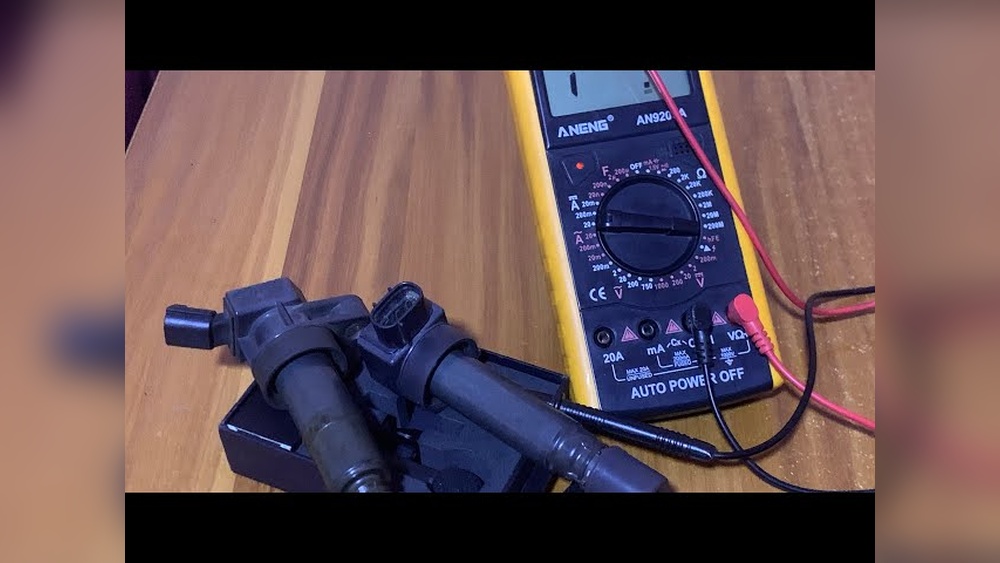
Testing a 2 pin ignition coil with a multimeter is a fundamental skill for anyone working with automotive or small engine systems. Whether you’re a beginner learning the basics or an experienced technician seeking advanced insights, knowing how to properly diagnose an ignition coil can save time, money, and prevent unnecessary replacement of components.
This comprehensive guide blends beginner-friendly explanations with advanced tips, real-world examples, and actionable advice. By the end, you’ll be equipped to confidently test, interpret, and troubleshoot 2 pin ignition coils using a multimeter, one of the most versatile tools in electrical diagnostics.
Ignition coils play a critical role in engine operation, converting low voltage from the battery into the high voltage needed to ignite fuel in the combustion chamber. A faulty coil can lead to misfires, starting issues, and even engine damage.
Yet, many coils are replaced unnecessarily due to misdiagnosis. Understanding how to test these coils efficiently ensures accurate results, reduces waste, and enhances trustworthiness for both DIY mechanics and professionals.
Key Takeaways
- Testing a 2 pin ignition coil with a multimeter involves checking both primary and secondary resistance.
- Beginner-friendly steps help ensure accurate diagnostics, while advanced suggestions reveal deeper troubleshooting.
- Reading and interpreting multimeter values is crucial, compare against manufacturer specifications.
- Common mistakes include improper meter settings and overlooking environmental factors like temperature.
- Real-world examples highlight practical application and typical coil issues.
- Tables and data comparisons clarify resistance ranges and testing tips for different coil types.

Credit: www.youtube.com
Understanding 2 Pin Ignition Coils
A 2 pin ignition coil is a simple yet vital component used in many vehicles, motorcycles, and small engines. It typically consists of two electrical terminals: one for power input, and one for ground or output. The coil uses electromagnetic induction to step up voltage, enabling spark plug ignition.
Components And Function
- Primary winding: Receives low voltage from the battery.
- Secondary winding: Generates high voltage for the spark plug.
- Pins: Two terminals, commonly labeled as positive (+) and negative (, ).
When current flows through the primary winding, a magnetic field builds. Interrupting this current collapses the field, inducing a high voltage in the secondary winding. This voltage is then delivered to the spark plug.
Common Applications
- Automotive engines: Older cars and some modern vehicles.
- Motorcycles: Most single-cylinder bikes and scooters.
- Small engines: Lawn mowers, chainsaws, and generators.
Why Testing Matters
Faulty ignition coils can cause:
- Engine misfires
- Starting difficulties
- Poor fuel economy
- Rough idling
Testing ensures you don’t replace a good coil or overlook a failing one.
Tools And Safety Precautions
Before starting, gather all necessary tools and observe safety guidelines. Proper preparation ensures accurate results and prevents injury.
Essential Tools
- Digital multimeter (preferably auto-ranging)
- Ignition coil specifications (usually found in service manuals)
- Insulated gloves
- Safety goggles
- Clean workspace
Safety Guidelines
- Disconnect the battery: Prevent accidental short circuits.
- Work in a ventilated area: Avoid fumes from fuel or electrical arcs.
- Handle coils carefully: High voltage can be dangerous.
- Avoid moisture: Water can skew readings and damage equipment.
Pro Tip: Always verify multimeter settings before connecting to the coil. Incorrect settings may cause inaccurate readings or damage the meter.
Credit: www.marineengine.com
Step-by-step Guide: Testing A 2 Pin Ignition Coil With A Multimeter
This section breaks down the entire process, from preparation to interpreting results, with both basic and advanced insights.
Preparing For The Test
- Locate the ignition coil: Refer to your vehicle or engine’s manual.
- Remove the coil: Disconnect both pins and ensure no power is supplied.
- Inspect visually: Look for cracks, corrosion, or burnt marks.
Setting Up The Multimeter
- Set the multimeter to ohms (Ω) mode.
- Use the lowest resistance setting for primary winding tests.
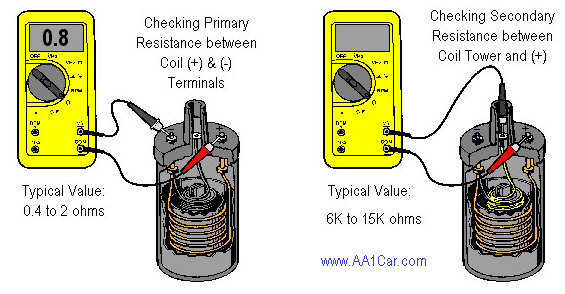
Testing Primary Resistance
- Connect probes: Attach the red probe to the positive pin and the black probe to the negative pin.
- Read the value: Typical primary resistance ranges from 0.2Ω to 5Ω depending on coil design.
- Compare with specifications: Refer to your manual or manufacturer data.
| Coil Type | Primary Resistance (Ω) | Secondary Resistance (Ω) |
|---|---|---|
| Automotive (Older) | 0.5, 3.0 | 8,000, 15,000 |
| Motorcycle | 0.2, 2.0 | 6,000, 12,000 |
| Small Engine | 0.6, 1.5 | 5,000, 10,000 |
Example: When I tested a Honda motorcycle coil, the primary resistance measured 1.1Ω, matching the manual’s 1.0, 1.3Ω specification.
Testing Secondary Resistance
- Switch multimeter to a higher resistance range (usually 20kΩ or above).
- Connect probes: One probe to each pin (same as primary), or if accessible, one to the plug terminal and one to a pin.
- Read the value: Secondary resistance should be significantly higher, usually in the thousands of ohms.
Warning: If secondary resistance is “open” (infinite), the coil is likely faulty.
Interpreting Results
- Within spec: Coil is likely good.
- Below spec: Indicates shorted windings.
- Above spec: Points to open or damaged windings.
| Reading Type | Possible Cause | Action |
|---|---|---|
| Low resistance | Short circuit | Replace coil |
| High resistance | Open circuit | Replace coil |
| Within spec | Normal | Retain coil |
Advanced Tips
- Temperature effects: Resistance changes with temperature. Test at room temperature for accuracy.
- Meter calibration: Use a known resistor to verify multimeter accuracy.
- Multiple tests: Conduct both primary and secondary tests; failure in either means the coil should be replaced.
- Check for intermittent faults: Wiggle coil wires during testing to detect hidden issues.

Credit: www.youtube.com
Common Mistakes And How To Avoid Them
Even experienced mechanics make errors when testing ignition coils. Understanding these pitfalls improves accuracy.
Mistake 1: Incorrect Multimeter Setting
Setting the meter to the wrong range can produce misleading results. Always start with the lowest setting for primary resistance and switch higher for secondary.
Mistake 2: Testing Without Disconnecting Power
Testing a coil while connected to power can damage the multimeter and yield false readings. Disconnect the battery before proceeding.
Mistake 3: Ignoring Manufacturer Specifications
Each coil model has unique resistance values. Using generic numbers risks incorrect diagnosis. Always consult the service manual.
Mistake 4: Not Accounting For Temperature
Coil resistance increases with temperature. For instance, a coil reading 1. 0Ω at 20°C may read 1. 2Ω at 40°C. Test at consistent conditions.
Mistake 5: Skipping Visual Inspection
Physical damage often indicates internal faults. Cracked housings or burnt terminals are red flags.
Real-world Examples And Case Studies
Applying theory to practice helps solidify understanding. Here are three examples from real diagnostics.
Example 1: Automotive Coil Testing
A Toyota Corolla owner experienced frequent misfires. Testing showed primary resistance at 0.7Ω (spec: 0.6, 0.8Ω) and secondary at 13kΩ (spec: 12, 14kΩ). Coil was good. The issue was traced to a faulty spark plug, not the coil.
Example 2: Motorcycle Ignition Coil
A Yamaha bike failed to start. Primary resistance measured 0. 1Ω, far below the 1. 0, 1. 2Ω spec. Coil replacement solved the problem.
Example 3: Small Engine Coil
A chainsaw struggled to idle. Secondary resistance read infinite (open circuit). The coil was replaced, restoring normal operation.
Comparing Different Multimeters For Coil Testing
Multimeter quality directly affects testing accuracy. Here’s how various models stack up.
| Multimeter Model | Resistance Range | Accuracy | Auto-Ranging | Price Range |
|---|---|---|---|---|
| Fluke 117 | 0.1Ω, 40MΩ | ±0.5% | Yes | $150, $200 |
| Extech EX330 | 0.5Ω, 20MΩ | ±1.0% | Yes | $50, $70 |
| Generic Digital Meter | 1Ω, 10MΩ | ±2.0% | No | $20, $30 |
Pro Tip: Invest in a quality multimeter for consistent results. Cheaper models may lack precision and reliability.
Advanced Troubleshooting And Diagnostic Techniques
For technicians and advanced DIYers, deeper diagnostic strategies can reveal coil issues missed by basic tests.
Oscilloscope Testing
An oscilloscope can visualize coil performance during engine operation. It shows voltage spikes and waveform abnormalities, which indicate internal faults.
- Requires advanced tools and skills
- Useful for detecting intermittent failures
Coil Load Testing
Some faults only appear under load. Specialized testers simulate spark plug operation, identifying coils that pass resistance tests but fail under real conditions.
- Utilized in professional workshops
- Detects weak spark and internal breakdowns
Environmental Testing
Coils may behave differently under heat or vibration. Use a heat gun or vibration table to simulate engine conditions and retest.
Warning: Only attempt advanced diagnostics with proper training and equipment.
Manufacturer-specific Procedures
Some modern coils integrate electronic modules. Testing methods may vary; refer to official manufacturer guidelines for these models.
Fluke Automotive Coil Testing Guide
Maintenance Tips To Prolong Ignition Coil Life
Proper maintenance reduces the risk of coil failure and ensures reliable engine performance.
Regular Inspections
- Check for physical damage or corrosion.
- Inspect wiring and connectors for wear.
Clean Connections
Dirty or oxidized terminals can cause resistance fluctuations. Use contact cleaner and a brush to maintain clean connections.
Avoid Overheating
Prolonged engine heat can degrade coil insulation. Ensure adequate cooling and replace coils showing signs of heat damage.
Use Quality Parts
Always choose OEM or reputable aftermarket coils. Inferior parts often fail prematurely.
Store Coils Properly
Unused coils should be kept dry and away from extreme temperatures.
Troubleshooting Related Ignition System Issues
Testing the coil is only one part of diagnosing ignition system problems. Here’s how to address related issues.
Spark Plug Testing
A good coil won’t produce a spark if the plug is faulty. Inspect plugs for fouling, wear, or damage.
Ignition Switch And Wiring
Faulty switches or broken wires can mimic coil failure. Use the multimeter to check continuity and voltage.
Battery And Charging System
Low battery voltage affects coil performance. Test battery health and alternator output.
Electronic Control Units
Modern engines use ECUs to regulate ignition. Software faults can cause misfires even with a good coil.
Frequently Asked Questions
What Is The Difference Between A 2 Pin And 3 Pin Ignition Coil?
A 2 pin ignition coil features only power and ground terminals, relying on external components for switching. 3 pin coils typically include an integrated ignition module or sensor, providing more precise control and diagnostics. Testing procedures for 3 pin coils may involve additional steps or specialized tools.
Can I Test A Coil Without Removing It From The Engine?
In most cases, you can test primary resistance without removing the coil, provided you can access both pins. However, for secondary resistance or if you suspect physical damage, removal is recommended for accurate readings and safety.
How Do I Know If My Multimeter Is Accurate Enough For Coil Testing?
Check the multimeter’s specification sheet for resistance accuracy, ideally within ±1%. Calibrate the device using a known resistor or consult the manufacturer’s guidelines. For critical diagnostics, use a reputable brand and avoid cheap, unbranded meters.
Are There Alternative Methods To Test Ignition Coils?
Yes, besides resistance testing, you can use a coil spark tester, oscilloscope, or coil load tester. These tools simulate real-world conditions and can reveal faults missed by resistance checks, especially intermittent or under-load failures.
What Should I Do If My Coil Tests Within Specs But The Engine Still Misfires?
If the coil tests good, inspect spark plugs, wiring, ignition switches, and engine sensors. Also, check for software or ECU issues in modern vehicles. Misfires can result from multiple causes; thorough diagnostics are essential for accurate repair.
Testing a 2 pin ignition coil with a multimeter is a valuable skill that combines both basic and advanced knowledge. By following structured steps, understanding resistance values, and avoiding common mistakes, you can confidently diagnose ignition coils in a variety of applications.
Remember to consult manufacturer specifications, use quality tools, and consider advanced troubleshooting when needed. Whether you’re a beginner or an expert, mastering these techniques leads to more accurate repairs, improved engine performance, and greater trust in your diagnostic abilities.