
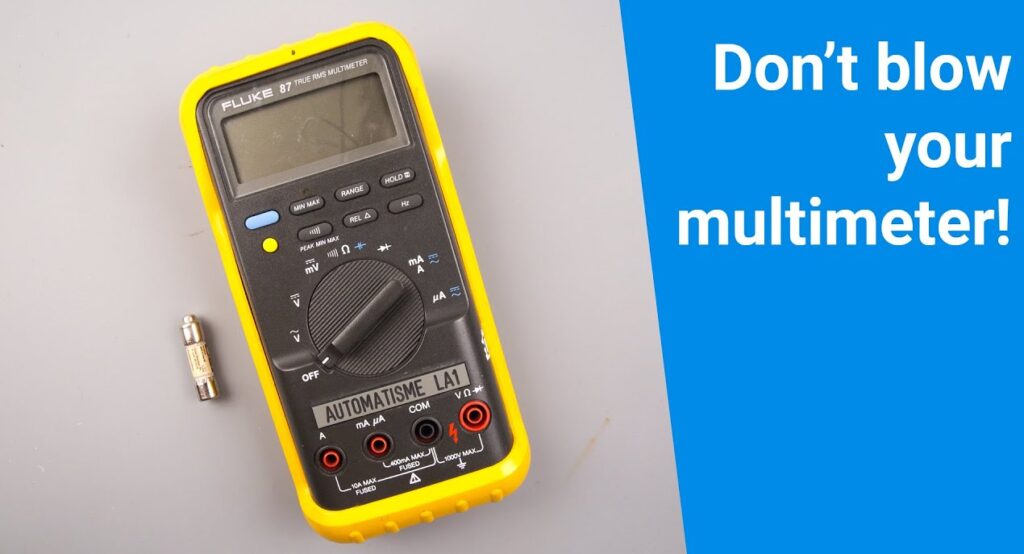
Many DIY enthusiasts, technicians, and even experienced engineers have experienced the frustration of blowing a fuse on a multimeter. Whether you’re measuring current in a household appliance or diagnosing a car’s electrical system, a blown fuse can halt your workflow and potentially damage your equipment.
The good news is that with the right knowledge and habits, you can almost entirely avoid this common and costly mistake.
This guide is designed as both a beginner-friendly primer and an advanced reference. You’ll learn the fundamentals of why multimeter fuses blow, step-by-step instructions to prevent accidents, and pro-level tips to ensure safety and accuracy. We’ll also explore real-world examples, common pitfalls, and the best practices for preserving both your multimeter and your peace of mind.
Key Takeaways
- Always select the correct measurement mode before connecting probes to a circuit.
- Double-check probe placement and connections to prevent accidental short circuits.
- Understand your multimeter’s fuse specifications and replace only with the recommended type.
- Never exceed the current rating of your multimeter when measuring amps.
- Practice safe measurement habits and regularly inspect your leads and instrument.
- Learn advanced techniques for high-current or specialized measurements to avoid fuse damage.

Credit: www.cuescreens.com
Understanding Multimeter Fuses And Their Role
Multimeter fuses serve as essential safety components, protecting both the device and the user from electrical overloads. To appreciate how to avoid blowing these fuses, it’s important to first understand their function and limitations.
What Is A Multimeter Fuse?
A multimeter fuse is a small, replaceable safety device located inside the multimeter. It is designed to interrupt the flow of current if it exceeds a safe threshold, preventing damage to the meter’s internal circuits and reducing fire or shock risk. Most digital multimeters (DMMs) use fast-blow or ceramic fuses for current (amperage) measurements.
Why Do Multimeter Fuses Blow?
Fuses blow primarily due to:
- Measuring current in excess of the meter’s rated capacity
- Accidental short circuits (e.g., connecting probes across a voltage source in current mode)
- Using the wrong measurement mode (like measuring voltage while set to amps)
- Faulty or damaged test leads causing unintended connections
Types Of Fuses In Multimeters
The two most common fuse types are:
- Fast-blow glass fuses: React quickly to overcurrent but are less robust against surges.
- High rupture capacity (HRC) ceramic fuses: Withstand higher energy and are recommended for CAT-rated meters (used in industrial or high-voltage environments).
| Fuse Type | Application | Response Time | Typical Rating |
|---|---|---|---|
| Glass Fast-Blow | Basic current measurements | Very Fast | 200 mA, 500 mA |
| Ceramic HRC | High-energy circuits | Fast | 10 A, 20 A |
Example: How A Fuse Saved A Multimeter
When measuring a car battery’s charging current, a hobbyist accidentally touched the probe tips together while in current mode. Instantly, the meter’s fuse blew, cutting off the circuit and preventing severe damage to the meter and avoiding a possible burn.

Credit: www.youtube.com
Common Mistakes That Lead To Blown Fuses
Recognizing the typical errors that result in blown fuses is the first step to prevention. Here’s a breakdown of the most frequent mistakes, along with real-world scenarios.
Measuring Voltage While Set To Current
This is perhaps the most common error, especially for beginners. When the multimeter is set to measure current (amps), it essentially acts as a low-resistance path. Connecting it directly across a voltage source can cause a massive current to flow, instantly blowing the fuse.
Example: A student, intending to check a 12V battery’s voltage, accidentally left the meter on the 10A current setting. The resulting short circuit blew the fuse and startled the student.
Exceeding The Current Rating
Attempting to measure current above what the multimeter is rated for is a surefire way to blow the fuse.
- Pro Tip: Always check the label near the current input jack, most handheld meters are rated for 10A for a maximum of 10 seconds.
Using Damaged Or Worn Test Leads
Cracked insulation or frayed wires can create unintentional shorts, especially when measuring current. Always inspect your leads before use.
Incorrect Probe Placement
Connecting the probes to the wrong jacks, such as the 10A input while measuring voltage, can bypass internal protection and damage the fuse.
Ignoring Meter Warnings
Many modern meters beep or display warnings if the probes are in the wrong port for the selected function. Ignoring these can result in blown fuses.
| Mistake | Consequence | Prevention Tip |
|---|---|---|
| Measuring voltage in current mode | Immediate fuse blow | Always check mode before connecting |
| Exceeding current rating | Fuse blow, possible meter damage | Know your meter’s limits |
| Damaged test leads | Unintended short, blown fuse | Inspect leads before use |
Step-by-step Guide: How To Measure Current Safely
Whether you’re troubleshooting electronics or doing car repairs, following a clear process is essential for safe measurements.
1. Understand The Measurement Circuit
Current must be measured in series with the load. Never attempt to measure current by placing the meter across a voltage source.
2. Power Down And Prepare
Before connecting your multimeter:
- Turn off the circuit or device.
- Inspect the multimeter and leads for visible damage.
- Set the meter to the highest current range available.
3. Insert Probes Into Correct Jacks
For most meters:
- Common (COM): Always black probe.
- Amps (A or 10A): Red probe for high current; use the mA/μA port for small currents.
Pro Tip: Double-check the probe placement and meter dial before every measurement.
4. Connect In Series With The Load
Break the circuit so current must flow through the meter. For example, disconnect one wire to a light bulb and insert the meter between the wire and the bulb.
5. Power On And Observe
Turn on the circuit and monitor the reading. If the current is within a lower range, switch the meter to a more sensitive setting for accuracy.
6. Remove And Reset
After measurement, power down the circuit and move the probes back to their default positions (usually for voltage measurement) to avoid accidental fuse blows in the future.
Real-world Example: Automotive Fuse Testing
When checking car fuses, always set the meter to the appropriate current range and connect in series with the fuse slot, not across the battery terminals. This prevents accidental high-current surges.
Credit: www.electronicrepairguide.com
Best Practices For Fuse Protection And Multimeter Longevity
Adopting disciplined measurement habits goes a long way in preventing blown fuses and extending your meter’s life.
Always Start At The Highest Range
Begin with the highest current or voltage range available and step down as needed. This prevents overloads if the actual value is higher than expected.
Return Probes To Voltage/com After Use
Immediately after measuring current, move the red probe back to the voltage port and set the dial to voltage. This simple routine prevents accidental shorts during future measurements.
Use Proper Fuses For Replacement
Never substitute a multimeter fuse with a random fuse from a hardware store. Use only the specified type (usually HRC ceramic for safety). Check your meter’s manual for the exact rating.
Regular Inspection And Maintenance
- Check leads for cuts, exposed wire, or loose connectors.
- Test fuses periodically with the meter’s continuity function.
- Clean the meter and leads with a dry cloth.
Avoid Measuring Unknown Circuits
If you’re unsure about the circuit’s current, voltage, or possible faults, don’t connect your meter directly. Assess the circuit first using schematics or a clamp meter for high currents.
Example: Industrial Electrician’s Routine
An industrial electrician always starts the day by checking all meter settings, probe positions, and fuse continuity. This habit, learned after blowing several fuses early in his career, prevents accidents and downtime.
Advanced Techniques And Safety Tips
Beyond the basics, advanced users and professionals can employ specialized techniques to minimize fuse risk, especially in high-energy environments.
Use Clamp Meters For High Currents
A clamp meter measures current without direct contact, eliminating the risk of blowing fuses entirely. These are ideal for AC systems or circuits above 10A.
Add External Shunt Resistors
For currents exceeding your meter’s rating, use an external precision shunt resistor and measure voltage drop across it. Calculate current using Ohm’s Law (I = V/R).
Cat Ratings And Safety Standards
Familiarize yourself with CAT (Category) ratings for your meter (CAT I, II, III, IV). Use only properly rated meters and fuses for industrial or high-voltage work. For more on standards, see the IEC Measurement Category.
Use Protective Accessories
- Fuse-protected probe leads add another layer of safety.
- Alligator clips can prevent accidental probe slips.
- Insulated gloves and safety glasses are recommended for high-energy systems.
Pro Tip: Log Your Measurements
Advanced users keep a logbook of current measurements, fuse changes, and any anomalies. This helps identify patterns and anticipate issues before they cause failures.
Troubleshooting And Fixing A Blown Multimeter Fuse
Even with precautions, accidents happen. Knowing how to quickly diagnose and fix a blown fuse minimizes downtime.
Symptoms Of A Blown Multimeter Fuse
- Meter shows no reading or always displays zero when measuring current.
- Continuity and voltage functions still work, but current does not.
- Some meters display a “fuse” warning or error code.
Step-by-step Replacement Process
- Power off and disconnect the meter.
- Remove the meter’s back cover (check warranty conditions first).
- Locate the fuse(s), usually cylindrical and near the input jacks.
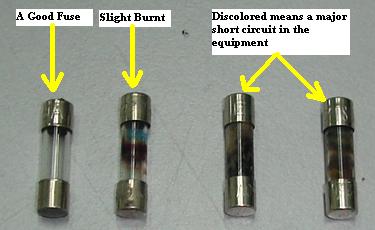
- Remove the blown fuse and inspect it for a broken filament or blackening.
- Replace with an identical fuse (same amperage, voltage, and type).
- Reassemble, test continuity, and resume work.
Sourcing The Correct Fuse
Consult your multimeter’s manual or the manufacturer’s website for the exact part number. Some reputable sources include Fluke and electronics distributors like Digi-Key or Mouser.
Example: Diyer’s Fuse Replacement
After blowing the fuse in a popular budget multimeter, a DIYer ordered a replacement from the manufacturer. Using a generic fuse from a local store caused inaccurate readings and a second failure, reinforcing the need for proper replacements.
Case Studies: Real-world Lessons In Multimeter Fuse Protection
Learning from others’ experiences can be invaluable. Here are a few concise case studies illustrating best practices and common mistakes.
Case Study 1: The Costly Workshop Error
A small electronics workshop lost three multimeter fuses in a single week. Investigation revealed that staff were measuring voltage on the current setting due to probe placement habits. After instituting a “probe reset policy” (always returning probes to voltage/COM after use), fuse losses dropped to near zero.
Case Study 2: Automotive Technician’s Discovery
An automotive technician repeatedly blew fuses when testing alternator output. The culprit was exceeding the 10A limit during cranking tests. Switching to a clamp meter for these high-current measurements solved the issue permanently.
Case Study 3: Advanced Lab Setup
In a university lab, students needed to measure currents above 10A. Instead of risking their meters, the instructor taught them to use precision shunt resistors and calculate current indirectly, preserving fuses and ensuring safety.
Case Study 4: Homeowner’s Mistake
A homeowner, testing current draw on a refrigerator, left the multimeter in the amp setting and then measured household voltage. The fuse blew, but the incident highlighted the importance of mode awareness, even for those with basic electrical knowledge.
| Scenario | Mistake | Lesson Learned |
|---|---|---|
| Electronics workshop | Probes left in amp jack | Always reset probes after use |
| Automotive technician | Exceeded current rating | Use clamp meter for high current |
| Lab students | Attempted over-10A measurement | Use shunt resistor for large currents |
Choosing The Right Multimeter To Minimize Fuse Issues
The selection of your multimeter plays a significant role in how often you’ll encounter fuse problems. Here’s what to consider for both beginners and advanced users.
Cat Rating And Build Quality
- CAT III/IV meters with HRC ceramic fuses are safest for demanding environments.
- Basic DIY meters may have only glass fuses, adequate for low-energy work, but less robust.
Auto-ranging Vs. Manual
- Auto-ranging meters reduce the risk of setting the wrong range, minimizing accidental overloads.
- Manual-range meters give more control but require extra vigilance.
Extra Features
Some advanced meters offer:
- Probe detection (alerts when probes are in the wrong jack)
- Fuse status indicator
- Integrated clamp meter
Recommended Brands
Brands like Fluke, Keysight, and Brymen are widely respected for safety and reliability. For beginners, reputable entry-level options like Extech or Klein Tools are also solid choices.
Example: Entry-level Vs. Professional Multimeter
| Feature | Entry-Level Meter | Professional Meter |
|---|---|---|
| Fuse Type | Glass | Ceramic HRC |
| CAT Rating | CAT II | CAT III/IV |
| Auto-Ranging | Yes | Yes |
| Probe Detection | No | Yes |
| Max Current | 10A | 20A |
Frequently Asked Questions
How Can I Tell If My Multimeter Fuse Is Blown Without Opening The Meter?
Most digital multimeters will read zero or display an error when attempting current measurements if the fuse is blown. However, the voltage and resistance functions will still operate normally. Some meters have a fuse test mode or an indicator icon.
For confirmation, use another multimeter to check continuity across the fuse through the meter’s terminals, if there’s no continuity, the fuse is blown.
Can I Use Any Fuse With The Same Amperage Rating As A Replacement?
No. The fuse must match not only the amperage rating but also the voltage rating and type (e.g., fast-blow, ceramic HRC). Using an incorrect fuse can compromise safety and meter performance. Always use the exact replacement specified in your meter’s manual or from the manufacturer.
Is It Safe To Bypass A Blown Fuse Temporarily?
Bypassing a fuse is extremely unsafe and not recommended under any circumstances. Doing so removes the primary protection for both the meter and the user, greatly increasing the risk of fire, electric shock, or severe meter damage. If a fuse blows, always replace it with the correct type before further use.
How Often Should I Inspect And Test My Multimeter Fuses?
For regular users, inspecting and testing fuses every few weeks is advisable. For professionals or those in high-risk environments, check before every measurement session. This can be done using the meter’s continuity function or visually if the fuse is accessible.
What Causes Some Fuses To Blow Even When Measuring Well Below The Meter’s Rated Current?
Occasional fuse blows below the rated current can be caused by short surges, brief accidental shorts, or faulty fuses. Other causes include degraded fuse elements from repeated minor overloads, poor contact in the fuse holder, or manufacturing defects. If this happens frequently, ensure you’re using genuine, high-quality fuses and check for issues in your test leads or measurement technique.
Whether you’re a beginner learning the ropes or a seasoned technician, safeguarding your multimeter fuse is vital for accurate, safe, and efficient electrical measurements. By understanding fuse function, avoiding common mistakes, and adopting advanced strategies, you’ll keep your multimeter, and yourself, protected for years to come. In my experience, consistency in measurement habits pays off more than any single feature or accessory. Remember: a few seconds of caution saves hours of troubleshooting and keeps your tools in top condition.