
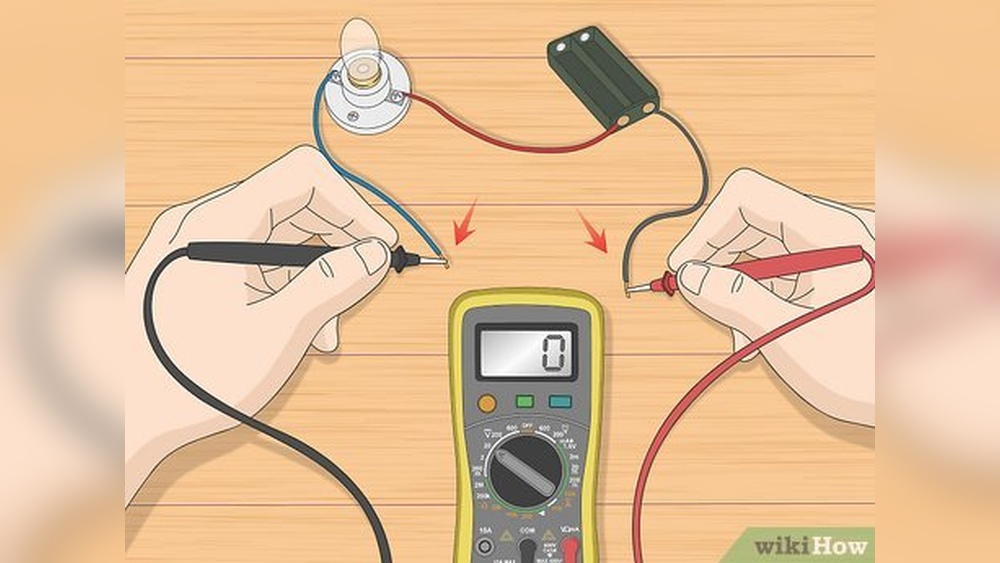
Using a multimeter is a rite of passage for anyone entering the world of electronics, whether as a hobbyist or a professional technician. The average multimeter, often found in toolkits and lab benches worldwide, is known for its versatility, measuring voltage, resistance, continuity, and, crucially, current. But when it comes to measuring current, one question persists: Can a multimeter truly be used as an ammeter?
Many beginners are cautious, and for good reason. Measuring current involves a different setup from checking voltage or resistance, and improper use can damage equipment or even cause injury. Yet, mastering this skill unlocks a deeper understanding of circuits and troubleshooting.
This article offers a comprehensive, beginner-friendly guide, packed with practical advice, real-world examples, tables, and expert insights, on how and when a multimeter can act as an ammeter, plus critical safety tips and advanced troubleshooting techniques.
Key Takeaways
- Multimeters can measure current (act as ammeters), but require a different setup than voltage or resistance measurements.
- Safety precautions are essential: Incorrect use can damage your multimeter or create hazards.
- There are differences between digital multimeters (DMMs) and analog multimeters when used as ammeters.
- Current measurement range and accuracy vary: Know your multimeter’s limits to avoid overload.
- Proper technique is crucial: Always connect the multimeter in series with the circuit when measuring current.

Credit: www.wikihow.com
Understanding Multimeters And Ammeters
Before diving into practical steps, it’s important to understand the fundamental roles of multimeters and ammeters. Both tools are staples in electronics, but they serve distinct purposes. This section lays the groundwork for using a multimeter as an ammeter.
What Is A Multimeter?
A multimeter is a versatile instrument that combines several measurement functions, typically voltage (V), current (A), and resistance (Ω), in one device. Modern digital multimeters (DMMs) also offer features like continuity testing, diode checks, and sometimes even temperature measurement.
Types of Multimeters:
- Analog Multimeters: Use a moving needle to display readings; best for observing trends.
- Digital Multimeters (DMMs): Offer precise, easy-to-read digital displays; the standard for most users.
What Is An Ammeter?
An ammeter is a device specifically designed to measure electric current in a circuit. Unlike multimeters, which are multipurpose, ammeters are optimized for current measurement, often with lower internal resistance and higher accuracy within a specific range.
How Do Multimeters Measure Current?
When set to measure current, a multimeter essentially acts as an ammeter by diverting the flow of electrons through its internal measurement circuit. This is fundamentally different from voltage or resistance measurements, where the tool is connected in parallel or across a component.
Pro Tip: Always double-check your multimeter’s manual for the correct current measurement procedure, as manufacturer designs can differ.
Key Differences: Multimeter Vs. Dedicated Ammeter
Understanding these differences helps you decide when a multimeter is sufficient and when a specialized ammeter is preferable.
| Feature | Multimeter | Dedicated Ammeter |
|---|---|---|
| Measurement Functions | Current, Voltage, Resistance, More | Current Only |
| Accuracy (within range) | Good | Very High |
| Internal Resistance | Higher | Very Low |
| Protection Features | Basic Fuses | Advanced Circuitry |
| Cost | Affordable | Usually Higher |
| Use Case | General Purpose | Laboratory/Industrial |

Credit: www.wikihow.com
Setting Up A Multimeter As An Ammeter: Step-by-step Guide
Measuring current safely and accurately requires proper setup. This section breaks down the process for both beginners and advanced users.
Choosing The Right Multimeter
Not all multimeters are created equal when it comes to current measurement. Ensure your device has:
- A current (A) measurement port: Some budget models lack this feature.
- Clear range markings: Look for distinct settings for milliamps (mA) and amps (A).
- Adequate fuse protection: Prevents damage in case of overload.
Safety Precautions Before You Begin
Warning: Measuring current incorrectly can short-circuit your device, blow the multimeter fuse, or cause personal injury. Follow these steps:
- Turn off power to the circuit before connecting the multimeter.
- Set the multimeter to the correct current range, start at the highest setting to avoid overload.
- Check the probe connections: Plug the red lead into the correct current port (often labeled 10A or mA).
- Inspect the fuse: Replace it if blown; never bypass it.
Series Vs. Parallel: The Critical Connection
The most common beginner mistake is connecting the multimeter in parallel (like for voltage). For current, always connect the multimeter in series with the load.
Example: To measure the current flowing through an LED, disconnect one end of the LED from the circuit, connect the multimeter between the open ends, then restore power.
Step-by-step Instructions
- Power off the circuit.
- Break the circuit where you wish to measure current.
- Connect the multimeter in series at this point, red probe toward the power source, black toward ground.
- Set the dial to the appropriate current range (start high; lower if needed).
- Power on the circuit and observe the reading.
- Power off and disconnect the multimeter after measurement.
Pro Tip: Protecting Your Multimeter
- Never attempt to measure current in wall outlets or high-voltage circuits unless your multimeter is rated for such use.
- If unsure of current magnitude, start with the highest current range.
- Replace fuses only with the specified type and rating.

Credit: www.youtube.com
Real-world Examples: Multimeter As Ammeter In Action
Applying theory to practice cements understanding. Here are concrete use cases to illustrate both beginner and advanced techniques.
Example 1: Measuring Battery Drain In A Small Device
A user wants to measure how much current a digital clock draws from its AA battery.
Steps:
- Remove one battery terminal.
- Set the multimeter to mA range.
- Connect the meter in series.
- Observe the current (typically a few mA).
Result: If the clock draws 7mA, you can estimate battery life by dividing battery capacity (e.g., 2000mAh) by the current.
Example 2: Checking A Faulty Circuit Board
An electronics repair technician suspects a faulty IC is drawing excessive current.
Steps:
- Identify the power rail supplying the IC.
- Desolder or lift one pin of the rail.
- Connect the multimeter in series.
- Set to the appropriate current range.
- Power the board and read the value.
Result: If the IC draws more than its rated current, it is likely damaged.
Example 3: Automotive Fuse Testing
A car owner wants to check the current draw through a specific fuse in a vehicle’s fuse box.
Steps:
- Remove the fuse.
- Insert the multimeter probes into the fuse holder contacts.
- Set the meter to the 10A range (automotive circuits can be high current).
- Turn on the relevant accessory and observe the current.
Result: If the reading matches the fuse rating, the circuit is healthy; a significantly higher reading indicates a fault.
Technical Limitations And Accuracy Concerns
While multimeters are convenient, there are important technical limitations when using them as ammeters.
Range And Resolution: Know Your Limits
Each multimeter specifies a maximum current rating, commonly 200mA for the mA port and 10A for the high-current port. Exceeding this can blow the internal fuse or damage the meter.
Resolution refers to the smallest current change the meter can detect. Digital multimeters typically offer good resolution in the mA range, but may be less precise at very low or very high currents.
Internal Resistance: The Burden Voltage
All ammeters, including multimeters, introduce a small resistance (burden) into the circuit. High burden voltage can skew sensitive measurements, especially in low-current applications.
| Current Range | Typical Burden Voltage (DMM) | Impact on Circuit |
|---|---|---|
| 200mA | 0.2, 2V | May cause voltage drop, affecting sensitive devices |
| 10A | 0.05, 0.5V | Minimal impact on high-power circuits |
Accuracy Specifications
Multimeter accuracy is typically specified as a percentage of the reading plus a fixed number of digits (e. g. , ±1. 0% + 2 digits). For critical measurements, this can introduce notable error.
Example: If measuring 100mA with a DMM rated ±1% + 2 digits, the real current could be anywhere between 97, 103mA.
Fuse Ratings And Replacement
Fuses in multimeters are a key safety feature, but not all are created equal. Some low-cost models use slow-blow fuses, which can be unsafe for high-current measurements.
Pro Tip: Use only high-quality ceramic fuses rated for your meter’s maximum current and voltage.
When Not To Use A Multimeter As An Ammeter
- Measuring large AC currents: Use a clamp meter instead.
- Continuous high-current monitoring: Multimeters are not designed for long-term high-current flow.
- In-circuit testing of sensitive ICs: Even small burden voltages can disrupt operation.
Advanced Techniques And Tips For Accurate Current Measurement
For those advancing beyond basic usage, these techniques enhance measurement accuracy and safety.
Using A Shunt Resistor For High Currents
A shunt resistor allows you to measure large currents indirectly. By measuring the voltage drop across a known low-value resistor, you can calculate current using Ohm’s Law (I = V/R).
Steps:
- Place the shunt resistor in series with the load.
- Set the multimeter to voltage mode.
- Measure the voltage across the shunt.
- Calculate current.
Example: With a 0.1Ω shunt and a 0.5V drop, current is 5A.
Zeroing For Greater Precision
Some advanced DMMs allow you to zero the reading to compensate for lead resistance and other offsets. Always zero the meter before taking low-current measurements.
Data Logging And Remote Monitoring
For extended measurements, some multimeters offer USB or Bluetooth connectivity, allowing you to log current over time for analysis, a valuable feature for research and troubleshooting.
Non-invasive Methods: Clamp Meters
For AC or high-current DC circuits, a clamp meter offers a non-contact, safer alternative. Clamp meters use a magnetic sensor to measure current through a conductor, without breaking the circuit.
Example: Use a clamp meter to check the current drawn by a refrigerator compressor without disconnecting wires.
Maintaining Measurement Accuracy
- Replace leads regularly to prevent resistance buildup.
- Calibrate your multimeter annually (or as recommended) for consistent results.
- Avoid measuring current in circuits with high voltage spikes, these can damage the meter.
Multimeter Specifications Comparison Table
| Model | Max Current Range | Accuracy (Current) | Burden Voltage | Features |
|---|---|---|---|---|
| Fluke 117 | 10A | ±1.0% + 3 digits | Low | True RMS, Backlight |
| Extech EX330 | 10A | ±1.5% + 2 digits | Medium | Temperature, Auto-range |
| UNI-T UT61E | 10A | ±1.0% + 2 digits | Low | PC Interface, Data Hold |
For more model comparisons, consult manufacturer datasheets or trusted sources like the Fluke official guide.
Common Mistakes And How To Avoid Them
Even experienced users sometimes make errors when measuring current. Awareness and preparation can prevent costly accidents.
Mistake 1: Connecting In Parallel
Connecting the multimeter across a load (parallel) when set to current mode can create a short circuit, as the meter’s resistance is very low in this setting.
How to Avoid: Always break the circuit and insert the meter in series.
Mistake 2: Exceeding The Current Range
Attempting to measure a current higher than the meter’s rated range blows the internal fuse and can damage the meter.
How to Avoid: Start with the highest current range, then step down if needed.
Mistake 3: Using The Wrong Probe Ports
Some meters have separate ports for high and low current. Plugging the lead into the wrong port can damage the meter or provide no reading.
How to Avoid: Check the markings and your manual before connecting.
Mistake 4: Forgetting To Switch Back To Voltage/resistance
Leaving the probe in the current port and then trying to measure voltage can create a hazardous situation.
How to Avoid: Always return the red probe to the correct port after current measurement.
Mistake 5: Ignoring Fuse Replacement
A blown fuse disables current measurement but may not affect other functions, leading to confusion.
How to Avoid: If you get zero readings in current mode, check and replace the fuse.
Example: A Costly Parallel Connection Error
A beginner, eager to measure current through a resistor, connects the multimeter across the resistor instead of in series. The multimeter’s fuse blows instantly, and the circuit is disrupted. This mistake is common but easily avoided by following best practices.
When To Use A Dedicated Ammeter Or Clamp Meter
A multimeter is a practical tool, but there are scenarios where a dedicated ammeter or clamp meter is preferable.
Industrial And Laboratory Settings
In settings where precision, durability, and safety are paramount, such as research labs or industrial environments, a dedicated ammeter offers:
- Higher accuracy
- Lower burden voltage
- Advanced safety features
High-current Applications
For measuring currents above 10A (such as in electric vehicle maintenance or industrial motors), a clamp meter or a shunt-based ammeter is safer and more robust.
Continuous Monitoring
If you need to monitor current over long periods, a dedicated ammeter with data logging, alarms, and remote connectivity is ideal.
Example: Solar Panel System Monitoring
A solar installer needs to monitor the current output of multiple solar arrays. Using a clamp meter allows for quick, safe, and non-invasive measurements of each wire, while a data-logging ammeter provides performance tracking over time.
Pro Tip: For home or hobbyist use, a high-quality multimeter is sufficient for most tasks. For professional, high-risk, or high-current environments, consider specialized equipment.
Frequently Asked Questions
How Can I Check If My Multimeter’s Fuse Is Blown?
To check the fuse, first power off and disconnect the multimeter. Remove the back cover and visually inspect the fuse, if the filament is broken or blackened, it’s blown. Some multimeters have a continuity check mode; place the probes across the fuse and listen for a beep.
Always replace with a fuse of the same rating and type.
Why Does My Multimeter Show Zero Amps When Measuring Current?
If your meter reads zero, check that the meter is connected in series, not parallel, and the circuit is powered. Also, verify the probes are in the correct ports, the dial is set to the right range, and the fuse is intact.
In rare cases, the current might be too low for the meter’s resolution.
Can I Measure Ac Current With A Standard Digital Multimeter?
Many digital multimeters can measure AC current, but typically only on the 10A range and for relatively low frequencies (50, 60Hz). For higher currents or non-sinusoidal waveforms, use a true RMS meter or a clamp meter designed for AC current measurement.
Is It Possible To Measure Current Without Breaking The Circuit?
Yes, with a clamp meter, you can measure current by clamping around a single conductor, no need to break the circuit. However, standard multimeters require opening the circuit and connecting in series.
What’s The Risk Of Measuring Current In Household Ac Circuits?
Measuring current in household AC circuits can be dangerous. Standard multimeters may not be rated for such use, and incorrect connection can result in electric shock or equipment damage. Always ensure your meter is CAT-rated for the voltage and use a clamp meter when possible.
Consult a licensed electrician for high-voltage work.
In my experience, taking the time to carefully set up your measurements, double-check connections, and respect the limitations of your multimeter is the key to both safety and accuracy.
A multimeter is a powerful ally for anyone exploring electronics, capable of acting as an ammeter when used correctly. By understanding the principles, practicing safe setup, and knowing when to reach for specialized tools, you can confidently measure current in a wide range of applications. Whether you’re a beginner or advancing your skills, these guidelines will help you make the most of your multimeter, safely, accurately, and effectively. For further reading and official guidance, see the Wikipedia entry on multimeters.