
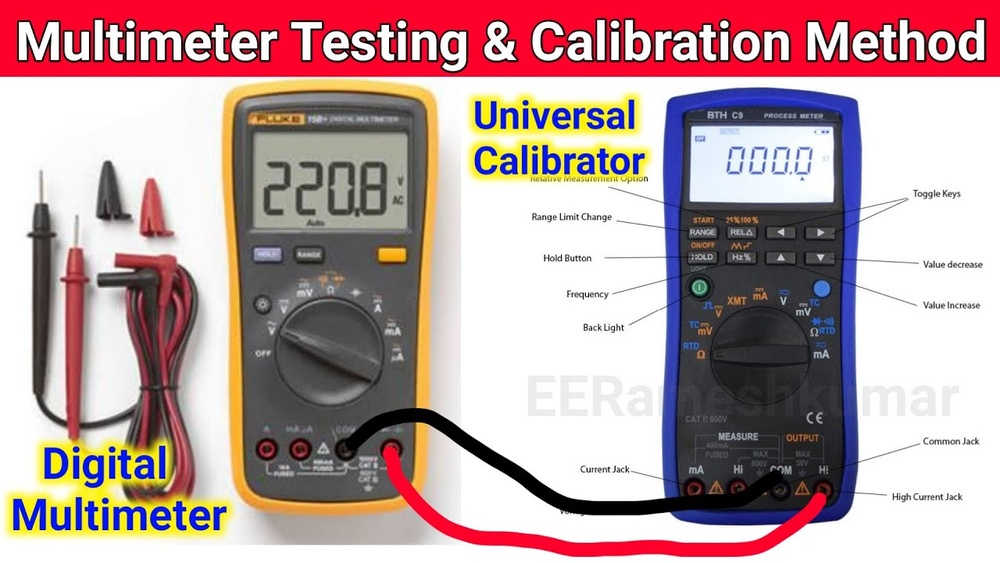
Calibrating a multimeter is a skill that bridges the gap between hobbyist electronics and professional electrical work. A properly calibrated multimeter ensures accurate measurements, whether you’re troubleshooting a home appliance or verifying sensitive industrial circuits. Yet, many users, both beginners and advanced, overlook the importance of routine calibration, risking inaccurate readings that can lead to misdiagnosis and costly mistakes.
In this comprehensive guide, we’ll walk through the entire process of calibrating a multimeter, breaking down each step in accessible language. You’ll find beginner-friendly explanations, advanced tips, real-world examples, and actionable advice from industry experience. By the end, you’ll not only know how to calibrate your device but also understand why calibration is essential for electrical safety, equipment longevity, and professional standards.
Key Takeaways
- Calibration ensures measurement accuracy for both DIY and professional projects.
- Different multimeter types require specific calibration methods and equipment.
- Routine calibration can prevent safety hazards and costly errors.
- Both manual and automated calibration processes are covered, with step-by-step instructions.
- Data comparison tables and real examples illustrate the impact of calibration.
- Advanced users will find tips for high-precision and laboratory-level calibration.
Understanding Multimeter Calibration
Calibrating a multimeter means adjusting its readings to match a known reference standard. Over time, internal components like resistors and voltage references can drift due to age, temperature, or mechanical shock, affecting the meter’s accuracy.
Why Calibration Matters
- Safety: Incorrect voltage or current readings can lead to unsafe decisions in electrical work.
- Diagnosis: Inaccurate values cause misdiagnosis in troubleshooting, resulting in wasted time and resources.
- Compliance: Industries such as aerospace, medical device manufacturing, and electrical utilities require traceable calibration records for audits.
How Multimeters Lose Accuracy
Multimeters use electronic components, such as resistors, capacitors, and analog-to-digital converters, that degrade with use. Environmental factors like humidity, vibration, and temperature swings can accelerate this drift. Even high-quality meters from brands like Fluke or Keysight require periodic calibration.
Calibration Vs. Adjustment
- Calibration is the process of comparing measurements against a standard.
- Adjustment means changing the meter’s internal parameters to correct errors found during calibration.
Pro Tip: Always calibrate before you adjust. Calibration may reveal that your meter is still within acceptable tolerance, no adjustment needed.

Credit: www.fluke.com
Tools And Standards Required For Calibration
To calibrate a multimeter effectively, you need more than just the meter itself. The right tools and reference standards are essential for both accuracy and safety.
Essential Tools
- Precision voltage source: Provides known DC voltages (e.g., 1V, 10V, 100V) for comparison.
- Precision current source: Delivers accurate, low-noise currents.
- Standard resistors: High-stability resistors with known values (e.g., 1Ω, 100Ω, 10kΩ).
- Calibration leads: Quality test leads reduce connection errors.
- Insulated work surface: Prevents accidental shorts and interference.
Reference Standards
Calibration standards are traceable, meaning their accuracy is certified and can be linked back to national or international measurement standards. Common references include:
- National Institute of Standards and Technology (NIST)
- British Standards Institution (BSI)
- International Electrotechnical Commission (IEC)
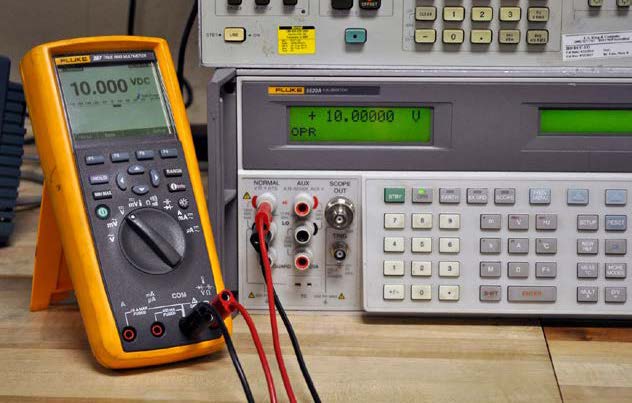
Example: A laboratory may use a Fluke 5522A Multi-Product Calibrator with uncertainties as low as 0.002% for voltage, ensuring extremely precise calibration.
Safety Precautions
- Always disconnect power before opening a meter for adjustment.
- Wear insulated gloves and safety glasses.
- Work in a static-free environment to protect sensitive electronics.

Credit: www.fluke.com
Types Of Multimeters And Their Calibration Needs
Different multimeter types require different calibration approaches. Understanding your meter’s category is crucial for selecting the right procedure.
Analog Vs. Digital Multimeters
- Analog multimeters (needle-based) are more susceptible to mechanical drift and require frequent zeroing.
- Digital multimeters (DMMs) rely on electronic references, which may drift slowly but need precise calibration.
Handheld Vs. Bench Multimeters
- Handheld meters are widely used in fieldwork and DIY projects. Their calibration is typically less stringent but still necessary.
- Bench multimeters are used in labs or production lines, offering higher accuracy and requiring regular, traceable calibration.
Auto-ranging Vs. Manual-ranging
- Auto-ranging meters select measurement ranges automatically, which can introduce more complex calibration needs due to additional circuitry.
- Manual-ranging meters have simpler electronics but need each range calibrated individually.
True Rms Vs. Average-responding
- True RMS meters accurately measure non-sinusoidal signals but need calibration for both AC and DC functions.
- Average-responding meters are less complex but less accurate for complex waveforms.
| Type | Calibration Frequency | Typical Use | Accuracy Requirement |
|---|---|---|---|
| Handheld DMM | 12-24 months | Field Service | ±0.5%-1.0% |
| Bench DMM | 6-12 months | Laboratory/Test Bench | ±0.01%-0.1% |
| Analog Multimeter | 6-12 months | Education, Legacy Equipment | ±2%-3% |
Credit: www.crossco.com
Step-by-step Calibration Procedure
Calibrating a multimeter involves a series of precise steps. This section breaks down the process for both beginners and advanced users.
Preparation And Initial Checks
- Read the manual: Manufacturer procedures often include meter-specific instructions.
- Inspect the meter: Check for physical damage, corroded terminals, or degraded leads.
- Warm up the meter: Turn on for at least 15 minutes (especially for bench DMMs) for thermal stability.
- Set up the environment: Aim for a stable temperature (ideally 23°C ±2°C) and low humidity.
Dc Voltage Calibration
- Connect the reference voltage source to the meter’s input.
- Select DC voltage mode and the desired range (e.g., 10V).
- Compare the reading with the reference. Note any error.
- Adjust if required: Use the calibration potentiometer or digital interface to zero the error.
Pro Tip: Many modern DMMs have a “cal mode” that locks out normal measurement functions and allows adjustment via software or hardware.
Ac Voltage Calibration
- Apply a precise AC voltage (e.g., 1kHz sine wave at 10V RMS).
- Select AC voltage mode and compare the reading.
- Adjust the AC calibration trimmer if available.
Dc Current Calibration
- Use a precision current source to deliver a known current (e.g., 1mA, 10A).
- Connect in series with the meter.
- Compare and adjust the reading as needed.
Resistance Calibration
- Connect standard resistors (e.g., 1Ω, 10kΩ, 1MΩ) to the meter.
- Zero the leads: Short the probes and adjust for zero ohms before measuring resistance.
- Measure and adjust the reading for each resistor value.
| Function | Reference Standard | Typical Tolerance | Adjustment Location |
|---|---|---|---|
| DC Voltage | Precision Voltage Source | ±0.05% | Internal Potentiometer or Software Menu |
| AC Voltage | Sine Wave Generator | ±0.2% | AC Cal Trimmer |
| DC Current | Current Source | ±0.1% | Current Cal Trimmer |
| Resistance | Standard Resistor | ±0.2% | Ohms Cal Trimmer |
Documenting Calibration Results
Record all “as found” and “as left” readings, calibration dates, standards used, and any adjustments. This creates an audit trail for professional use.
Common Calibration Errors And Troubleshooting
Even experienced technicians can run into calibration issues. Here’s how to identify and resolve the most common problems.
Lead And Connection Issues
- Dirty or corroded probes can introduce resistance, causing errors.
- Loose connections or poor-quality leads create intermittent faults.
Pro Tip: Always clean probe tips with alcohol and inspect leads for breaks before starting calibration.
Environmental Factors
- Temperature swings affect reference voltages and resistance readings.
- Electromagnetic interference from nearby equipment can skew results.
Example: In a factory, a technician found that calibration results drifted due to a large motor cycling on and off nearby. Shielding the workspace and calibrating during downtime solved the problem.
Misuse Of Reference Standards
- Expired calibration standards or those not traceable to national labs yield unreliable results.
- Incorrect range selection (e.g., using a 100V standard on a 10V range) magnifies errors.
Internal Component Failure
- Aging electrolytic capacitors may cause unstable readings, especially in analog meters.
- Damaged input protection circuits can short or open, requiring component replacement before calibration.
Advanced Calibration Techniques And Best Practices
For users aiming to achieve laboratory-level accuracy or maintain meters in regulated industries, advanced calibration methods are essential.
Using Automated Calibration Equipment
Calibration benches, such as the Fluke Met/Cal system, automate source application, reading acquisition, and adjustment. This:
- Reduces human error
- Increases throughput for large fleets of meters
- Generates digital calibration certificates
Software-based Digital Calibration
Modern DMMs often include a USB or serial interface for software-driven calibration. Steps include:
- Install manufacturer’s calibration software.
- Connect the multimeter to a PC via USB.
- Follow guided prompts to apply standards and record readings.
- Automate adjustments where supported.
Traceability And Certification
In regulated industries, calibration must be traceable. That means:
- Calibration standards must be certified by an accredited lab.
- Records are maintained for each meter, including serial numbers, dates, and results.
- Audits can confirm that all meters used in production or testing are within calibration.
Wikipedia: Calibration provides further details on the importance of traceability.
Environmental Control
For the most accurate calibration:
- Control temperature to within ±1°C of standard (usually 23°C).
- Maintain humidity between 30-60% RH.
- Shield from electromagnetic interference with grounded workbenches and anti-static mats.
High-precision Resistor Networks
Advanced users may build or purchase networks of 0.01% tolerance resistors for in-house resistance calibration. These networks are stored in controlled environments and periodically verified against primary standards.
Real-world Examples And Case Studies
Understanding calibration in theory is one thing; seeing its impact in real-world scenarios brings it home.
Case Study 1: Industrial Maintenance Team
An automotive factory’s maintenance team noticed an increase in failed voltage measurements, leading to downtime. Investigation revealed that half the team’s handheld DMMs were out of calibration by more than 1%. After recalibration, the error rate in troubleshooting dropped by 80%, and equipment downtime decreased significantly.
Case Study 2: Hobbyist Electronics
A hobbyist building a high-fidelity audio amplifier found that their budget multimeter displayed resistor values 5% higher than the actual value. After calibrating using a set of standard resistors and a lab-calibrated DMM as a reference, the hobbyist achieved more accurate readings, resulting in improved amplifier performance.
Case Study 3: Laboratory Quality Control
A test lab responsible for certifying electronic assemblies uses bench DMMs with annual calibration traceable to NIST. When a meter drifted out of spec, the lab’s automated calibration system flagged the error, and the meter was serviced before it could impact product certification.
Calibration Frequency And Maintenance Schedules
How often should you calibrate your multimeter? The answer depends on usage, environment, and required accuracy.
Manufacturer Recommendations
Most manufacturers recommend:
- Annual calibration for professional or laboratory use.
- Every 1-2 years for occasional or hobbyist use.
Usage-based Scheduling
Meters used in harsh environments (e. g. , field service, plant maintenance) require more frequent checks. Exposure to vibration, moisture, and temperature extremes accelerates drift.
Record Keeping
Maintain a calibration log for each multimeter, including:
- Date of last calibration
- Standard used
- Technician’s initials
- Results and adjustments
This is especially important for compliance in regulated industries.
| Environment | Recommended Calibration Interval | Notes |
|---|---|---|
| Laboratory | 6-12 months | Traceable standards required |
| Industrial Field | 6-12 months | Check more often if dropped or exposed to harsh conditions |
| Hobby/Home | 12-24 months | DIY check against a reference meter or resistor |
Signs Your Meter Needs Calibration
- Inconsistent readings compared to other meters or known references.
- Drift in zero readings when probes are shorted.
- Meter has been dropped, exposed to moisture, or subjected to high voltage.
Diy Vs. Professional Calibration Services
Should you calibrate your multimeter yourself, or use a professional service? The answer depends on your needs, available equipment, and regulatory requirements.
Diy Calibration
Advantages:
- Cost-effective for hobbyists and small businesses.
- Immediate feedback and control over the process.
- Educational, helps users understand their equipment.
Limitations:
- Lacks traceability unless you have certified standards.
- Potential for error without proper equipment and knowledge.
Pro Tip: For critical work (medical, aerospace, compliance testing), always use a professional lab.
Professional Calibration Services
Professional labs offer:
- Traceable calibration with certified equipment.
- Detailed calibration certificates for regulatory compliance.
- Adjustment and repair services if the meter is out of spec.
Costs range from $50 to $200+ per meter, depending on accuracy and functions tested.
Fluke: Why Calibrate? offers more insight into the benefits of professional calibration.
When To Choose Each Option
- DIY: Suitable for hobbyists, education, non-critical fieldwork.
- Professional: Required for regulated industries, product certification, or when traceability is needed.
Frequently Asked Questions
How Do I Know If My Multimeter Is Out Of Calibration?
Symptoms include inconsistent readings compared to other meters, failing to measure known values accurately (e.g., household AC voltage), or showing significant drift in zero readings. If your meter has experienced a drop, exposure to moisture, or a high-voltage event, calibration should be checked regardless of the schedule.
Can I Use Household Batteries For Calibration References?
While you can use a new 1.5V AA or 9V battery as a rough voltage reference for a quick check, these sources are not precise enough for calibration. Battery voltage varies with age, temperature, and load, so use only for basic sanity checks, not true calibration.
What Is The Difference Between Calibration And Adjustment On A Digital Multimeter?
Calibration means comparing the meter’s readings to a known standard, recording any errors, but not changing the meter itself. Adjustment is the process of physically or digitally tweaking the meter to correct errors found during calibration. Most manufacturers require calibration first to determine if adjustment is necessary.
How Can I Improve Calibration Accuracy At Home Without Professional Standards?
You can increase accuracy by borrowing or renting a recently calibrated multimeter and using it as a reference, using high-precision resistors (0.1% or better), and calibrating in a temperature-stable room. Keeping your workspace free from electrical noise and using quality leads also helps.
Do I Need To Recalibrate After Changing The Battery In My Multimeter?
Generally, changing the battery does not affect calibration since battery voltage is regulated internally for measurements. However, if your meter starts behaving erratically after a battery change or shows errors, perform a quick check with a known reference.
A well-calibrated multimeter is the backbone of accurate electrical measurement, whether you’re a beginner testing circuits at home or a professional in a regulated industry. By following the right procedures, using appropriate reference standards, and maintaining a calibration log, you ensure your measurements are trustworthy and your work is safe.
Investing time in calibration not only protects your equipment but also builds confidence in your results, a lesson learned through years of hands-on experience and industry best practices.